Sewing Cafe

Patterns, Tutorials and Works in Progress from the Sewing Studio of Lynne Williams
Showing posts with label quilting. Show all posts

Tuesday, August 6, 2013

Sewing Cafe-Retirement Pillow Project

 Judy A(student of sewing cafe) came up with this brilliant gift idea.


A Pillow made from men's ties.
Her brother retired recently after 40 years of teaching.  What was the first thing on his retirement agenda but to get rid of all of his ties.  Judy scooped them up to make this memorable gift.  
She opened them all up and then crazy quilted them on to a muslin backing.


Once she had the front complete I went through my fabric stash to find these complimentary cording and backing pieces. So masculine right?

Easy project, Great gift!

Tuesday, July 9, 2013

Beach Quilt Completed

Perhaps you have forgotten about my quilting/home decor project?


There were certainly times this winter when I had, but I am determined to finish some of my current projects, before adding any more to the list.  
Like most projects it started with a dream, a dream to have a summer quilt that reflected  the coastlines from which Chuck and I hail from....Florida and California respectively.


It began with this pattern.
I am a sucker for stars, diamonds, and lots and lots, of small pieces


I collected fabrics for over a year.  Batiks that reflected the sea and sand.
It all finally culminated in this....


It reminds me of beach glass


I did the top quilting myself with a simple orange peel pattern.
The large overlapping circles reminds me of drops on water.
I marked the pattern with a frixion pen and stitched it using my walking foot on my Bernina


I love the backing, a warm cream with swirls of sand on it.

What inspires your quilting?
A place?
A pattern?
A fabric?
A friends quilt? 

Sunday, January 20, 2013

A lot of Lurking & A touch of sewing

This title is not to suggest that in my lengthy posting absence that I have not been sewing. 
 Heaven Forbid!  
Rather it is to say that I have been exploring lurking.  You know reading blogs appreciating and even using the information while rarely leaving a comment trail.  


Quite honestly it feels a bit like walking into someones home while they are out, raiding their fridge and sneaking out with out a "by your leave".

But enough about lurking (questions to follow) and on to sewing....Hooray!

This is a small sampling of what I have been up to of late, more to follow in the days ahead possibly.

"Your assignment should you choose to accept it"
 Create a bra for an elderly client with sloping shoulders a 32" rib cage and a E cup.
I used the Pin-Up Girls Classic Bra Pattern with no alterations(seriously, just follow the directions) and achieved a perfect fit and the only comfortable bra she has ever had!!

 and from the back.  
I have have made 3 of these in total and still need to make another in black 
&
1 in red and white gingham
( that is supposed to be a teaser of sorts)


For the same client a quilted vest from Moda charm packs.  She used to do more sewing herself, but in her semi-retirement she has decided its more fun to be the designer.
  She provides me with the idea, the fabrics, and some of the notions( buttons in this case) but leaves me lots of room to add my own touches.

What a great client!!

This close up shows some of my touches.  
After sewing the charm squares together. I hand quilted them to a layer of cotton flannel using different colors of embroidery floss.  
The breast pocket was an additional touch to help achieve two objectives.
 1- Create a space to show off her hankie collection.
2- Balance out the bust by creating a focal point above it and drawing the eye back towards her lovely face.

Now back to the questions, because I really want to know:)
Do you like to lurk?
Do you prefer it?
Do you ever feel guilty for it?
Do you find commenting bothersome, required, pointless,  or challenging?

Sunday, August 12, 2012

Charity Quilt #1 - Half Square Triangle Overload


Thrilled does not even begin to describe my feelings about this quilt and the ladies who participated in its creation.  
I am impressed by the quality of stitching in every block.  
Peg and I had no difficulty in assembling the blocks into this soothing quilt because each block was properly squared...no small feat for half square triangle units.
Now that its assembled it will be sent off to Tina who will be quilting it for us on her new long arm machine.  I cannot wait to see what she decides to with it.  
It reminds me of ocean waves, which I hope will provide some comfort to the family that receives it.

Thanks to all the helping hands.  I am already looking forward to our next one:D

For information on the pattern we used see this post

Sunday, July 22, 2012

Beach quilt progress

My Beach Quilt is coming along swimmingly :D  

A little each day and before you know it.....


......you have these 2-4 patch units and a simple half square triangles ( hst) made into .......


this 12" block or.....


this 12" block.
Can you see the difference between the two?  
It's really important because you cannot achieve the over all pattern with out these two different block styles.  The directions only show you the one on top...and no matter how long you look at it, or spin it around and look at it again you still need both styles.  

At this stage though its fairly disappointing and I ask myself, did I get my values correct?
There is really no way of knowing without pushing ahead and hoping for the best, so push ahead I did.


Starting to feel a little more confident 10 blocks into the pattern, but still hesitating.
Who knew I was so cautious?


I am now a little over half way through the 30 blocks I need to make my queen size quilt.
These blocks are not sewn to each other yet, but just stuck to my design wall(aka flannel taped to a spare wall in the studio) slightly overlapping each other to kind of mimic the seam allowance take up, but you get the idea.  I won't sew them together until all 30 blocks are made.

The best part of quilting is seeing the pattern emerge with each new block. I suppose its the same satisfaction you get from putting together a puzzle.
  
Quilting teaches you sewing accuracy and a lot about color.  
For instance the importance of learning to see value - aka. the lightness to darkness ratio.  The psychology of color - what soothes, what excites?  It allows me to play with color combinations I might not think of using in clothing, which encourages me to use new color combinations in my personal wardrobe as well as my clients. For instance today I wore my yellow silk madman dress with a tan belt, light blue shoes and an aqua jacket!  I loved it! 
 Seeing it here, helped me find it in my closet.  
Now that's a win win in my book!

What new colors are you wearing this season?


Additional posts about this quilt:

Monday, July 16, 2012

Hand Quilted Book/Notebook cover

Recently I was asked to make a quilted book/notebook cover for a friend, by her daughter, as an anniversary gift.
Still with me - lol

This quilted cover is for a reference bible and holds a notebook, pen and highlighter as well.  It zips around the edges so you don't lose any notes or additional reference material you may need to stash.


This is the front of the cover when its neatly zipped.


This is the back of the cover, where I highlighted a different part of the print.


After cutting out the pattern pieces and sandwiching batting between the layers I sit down to some good old fashioned hand quilting.
I use embroidery floss in complimentary colors and just stitch wherever my heart desires.
It was nice to think about my friend and her many lovely qualities as I stitched.  
Can people feel the love in a hand stitched / hand made item?


Hurray - now you can see the coordinating lining fabric:)  
You can also see the pocket on the back of the cover that holds a notebook and pens.
It's roomy enough to hold a songbook as well...just say'n.


I slipped my Bible into the finished cover to make sure I had not made it to tight....a common issue of mine.
The "pocket" that holds the Bible/book into the cover can of course also hold additional items as well...say your study article or reference material.

This is a great grab and go item.  
For instance....to the park, or a waiting room, etc
I can do a little reading or some in depth studying sitting outside or while waiting for the car to be tuned up.

Do organizational items like this appeal to you or do you prefer to simply throw everything into a bag and go?


Monday, June 25, 2012

The Spitzen tote


Spring has kept me busy:)  How about you?
 One of the accomplishments for June has been these totes.
I call these Spitzen totes.  Spitzen is German for little bits and these totes are made from "little bits" hanging about the shop.  


This particular tote was made for a young girl I know whose favorite color is red and will be used to get her Bible and songbook to meetings easily and fashionably:)  It is always fun sewing for others, so much love and good intentions get sewn into every seam and it helps me to reflect on all the beautiful quality's I admire in that individual.  While sewing for Cherie I thought about her ready smile, her hugs and exuberance, her girlish sweetness....it's good to be young.


This tote is a little more subdued and will be posted in my Etsy shop for sale.
Each tote is unique, different fabrics trims, and embellishments which makes sewing them up so enjoyable.
The handles are rolled for strength and comfort. 

The tote measures 11" x 7" x  3"


The back has a pocket and the lining has a divided pocket on one side perfect for holding your phone, gum, lipstick, wallet etc.  
This is a Williams Studio 2 pattern developed a few years back for my "learn to sew" series.  This pattern teaches you the basics of crazy quilting and lets you explore many of the fancy stitches on your machine.  The possibilities are endless and they do make great gifts.


These are two more examples of the Spitzen tote, which I thought I would throw in.  The tote on the left is made from woolens, and I use it during the winter months and the tote on the right is my current favorite.  The rose on the front is thread painted and tacked on to add dimension and fun.
Both of these were originally done as class samples.

Wednesday, May 30, 2012

Craftsy Block of the Month - May

I am all caught up with my Craftsy blocks of the month now...Hurray!
I can't believe I have 10 completed blocks and they are all very bright and colorful.  Its been fun working with these colors and exploring some new techniques. 
 I really recommend this class if you would like to expand your sewing skills, learn to quilt, or play with color. 

This block is called "Modern Log Cabin"  Sewn in the traditional manner of a log cabin block but adding the background fabric between the color strips as well as changing the width as you move around the block.
Reminds me of the Polariod blocks that Rachel did over at Stitched in Color....which I really like and hope to get to do one day.


This 2nd block is called "Wonky Log cabin" which uses the same techniques as crazy quilting but you do not use a foundation fabric, you simply sew strips around a center medallion until you have a piece of fabric that is larger than your required block size and than true her up.

Looking forward to seeing what June has to offer 

Sunday, May 20, 2012

To the Beach Quilt Stat!

My goal for many years now has been to have seasonal bedding.  In Wisconsin that means winter and summer, and summer is really more like an extended spring, which is why we still need quilts on our beds. 

The first quilt I made for our bed was definitely for winter, but I have yearned to lighten the palette for the spring and summer months, make something that felt resort like. Chuck is from Florida and the thing he misses the most about his home state....the beaches


Now I understand why. 
 This looks warm and inviting whereas in my home state of California we have.....


Rocky beaches with cold dark water and vicious currents.
Feel free to scroll back up to that Floridian beach to help you get over the chill that has just set in before you continue to the actual quilt project.


Charlotte Angotti
This is the pattern I am using as my launching point.  It is called "The Natural" by Charlotte Angotti.
The pattern is for a 60 x 72" quilt but I need it for a queen bed with a very deep mattress.
This change in size required adding a pattern repeat horizontally and vertically.
If  I did my math correctly the quilt will require 265 half square triangle units and 144 four patch units!


It took 2 sessions to get all my strips and squares cut from my batik scraps but don't these colors remind you of the sea?

  
My set up at the machine for sewing the half square triangle units.  After I have sewn a dozen or so, I cut press and square.


My first batch!  Does this say beach to you?  This is the exciting part about quilting, when you see your color choices come together.  Now I am anxious to do more, but for now it's back to capes, cowls and alterations
My plan is to do 30 minutes a day of piecing, which should get me a quilt top in no time:)....no time at all - lol

Thursday, May 17, 2012

Craftsy BOM - April

This is me playing blogging catch up....my bad:)
Don't be surprised if you see a flurry of posts, all things I wanted to share with you in April but just couldn't get my blogging mojo going. 
This post features my Block of the Month for April....yes April...and here we are mid May!!
and no I have not even started my May blocks.....but I have started my beach quilt...:D but more on that a little later.


This first block for April is called " Hexi Stripe Block" and it used paper templates.
After printing the template up I made copies out of freezer paper which I than ironed onto my fabric scraps.
I enjoy doing this kind of hand work in the evening don't you?
It's so relaxing.


The 2nd block for this month, was a bit of a free for all using the hexagon.
I did not care for the pattern that our instructor Amy had chosen, so after playing with the templates for a bit I settled on this.  I think it will work better with the rest of the blocks, but time will tell.  In fact it just may be time to attempt a picture of the completed blocks together.  

For those of you taking this free class, are  you keeping up each month, or have you become sidetracked with some other fabulous project? 

Tuesday, March 27, 2012

Craftsy Block of the Month - March

My sewing mojo is at an very low ebb.  A lack of motivation along with project indecision has me working at a snails pace.

I was a might disappointed with myself that I did not get my Eva dress gardening overalls completed in time for the contest, but sometimes you cannot rush the design process.  I am pleased with the direction they have taken, but I feel like I am sewing in treacle....sweet as it is, it has been at a snails pace.

My quilt blocks were on my calendar for this last weekend and they are great fun to whip up.
  Both blocks only take half a day to create and work out best if not over thought :)  
Just the right project for my dragging fingers.


This one is known as a Broken Spider Web


This one is a String block.

Both are foundation pieced on fabric, which is similar to how you crazy quilt.  
It's a fabulous way to use up small scraps which is always useful, but now has me thinking of how to organize my small scraps....by color? 
 Any suggestions would be most welcome :)

I am looking forward to seeing what blocks April will have to offer.  Each month when I complete these blocks I always think " oh...these are me favorite so far"  I suppose this is what keeps us quilting - lol
This quilt is going to end up in the guest room for sure...you know the room with the apricot walls, the room that my recent ufo has moved into.

I am curious to know what you do when you lose your sewing mojo.
How do you find your inspiration and work ethic again?

I might have to lay some blame on Pinterest's doorstep, because I will admit to becoming so overwhelmed with the creative possibilities that  my mind spins out of control and it's hard to settle down to actual creation.  As an example...in the last month I have tried 4 new recipe's, am learning how to crochet, have decided to start making gloves and bras, have found several good projects for students, and started reading a recommended book.....

As my husband says " Well, there's your problem" LOL


Tuesday, March 13, 2012

UFO Progress report - A Scrappy Short Story

Pleased as punch to have completed another UFO  Yippee!! 


This mini quilt was started in the summer of 2007 while at a horse show in Madison
Wisconsin.  Yes I take my sewing machine just everywhere that I think I will have an opportunity to sew.  My opportunity during this horse show was between the morning and evening classes.  The perfect little project to while away the time.


The pattern is called Short Story by Miss Rosie's Quilt Co. from her Schnibbles line of patterns.
The original pattern finishes up at 33" x 33" but mine is smaller because I decided to make a pillow sham out of it.


It's not everyday that you get to see the back of the quilt.
This is my chosen method for pressing the seams to help reduce the bulk.


Quilting my layers together.  
 The Piano key border will become the flange around the pillow.


The finished pillow is now sitting proudly if not a bit lonely in our new guest room.  
You know the room...the one vacated by our daughter a few years back. 
 It has been painted apricot, such a soothing color.
 I have big plans for the bedding/day bed and this is it's first official item:)
I am still looking for the right fabric for the mattress cover but I do have the fabric for the dust ruffle and some thrift store finds to make more pillows with.

Wednesday, February 15, 2012

Craftsy Block of the Month - February

My Craftsy.com blocks for February are certainly bright and beautiful thanks to a very recent fabric purchase at Marmalade.
This block was made using  Lou Lou Thi by Anna Marie Horner ( the aqua bits) and Tonal Kaleidoscope by Michael Miller ( the orange bits)


I learned a new technique for sewing half square triangles on this Balken Puzzle Block.  It is quick but leaves you with bias edges on all your squares!  Not something I would recommend to beginners as they are more apt to stretch those edges while pressing and sewing.  If you have a lot of experience handling difficult fabrics though I would recommend you try this technique.


My Chunky Chevron Block, which I do love  has 2 prints from my January blocks and the chunky chevron bit also from Marmalade is Lark from Amy Butler.

This block also used half square triangles but a different technique for sewing them up and one I had used before.  Amy Gibson ( our instructor) has you cut the squares 1/2" larger then necessary which gives you plenty of room for squaring them up.  I rather liked that actually.  

These classes do assume that you know how to rotary cut squares and strips, as well as know how to sew an accurate 1/4" seam.  But outside of that I think Amy does a fine job of showing you the steps.  Like most experienced sewers, she makes it look quick and easy....you might want to slow down a bit so you are careful about your accuracy in cutting and sewing.  Several of the 40,000 participants were having difficulty with their finished  Balken Puzzle block size..this relates to that accurate cutting and sewing, it being more difficult to accomplish on all those bias edges.

Saturday, February 11, 2012

UFO Progress - Indygo Jacket Complete


Sweet!!  My "bed jacket" is complete.  I finished sewing the buttons on last night. 
Don't you think they are perfect? What a find at MJ trim.
I wish I could better express the scrumptious feel of the jacket.  It's quilted layers feel more like a sweater then a jacket due to the fact that there is no interfacing or traditional tailored structuring.
The silk lining against the skin...don't think I need to say much on that score.
The slightly bell sleeve adds to the comfort, no binding at the elbow or bicep.


For a recap....we have a wool and angora blend fabric which has been hand quilted with silk thread to the silk charmeuse lining. 
 The princess and cuff seams are lapped and wrapped in the silk lining.  
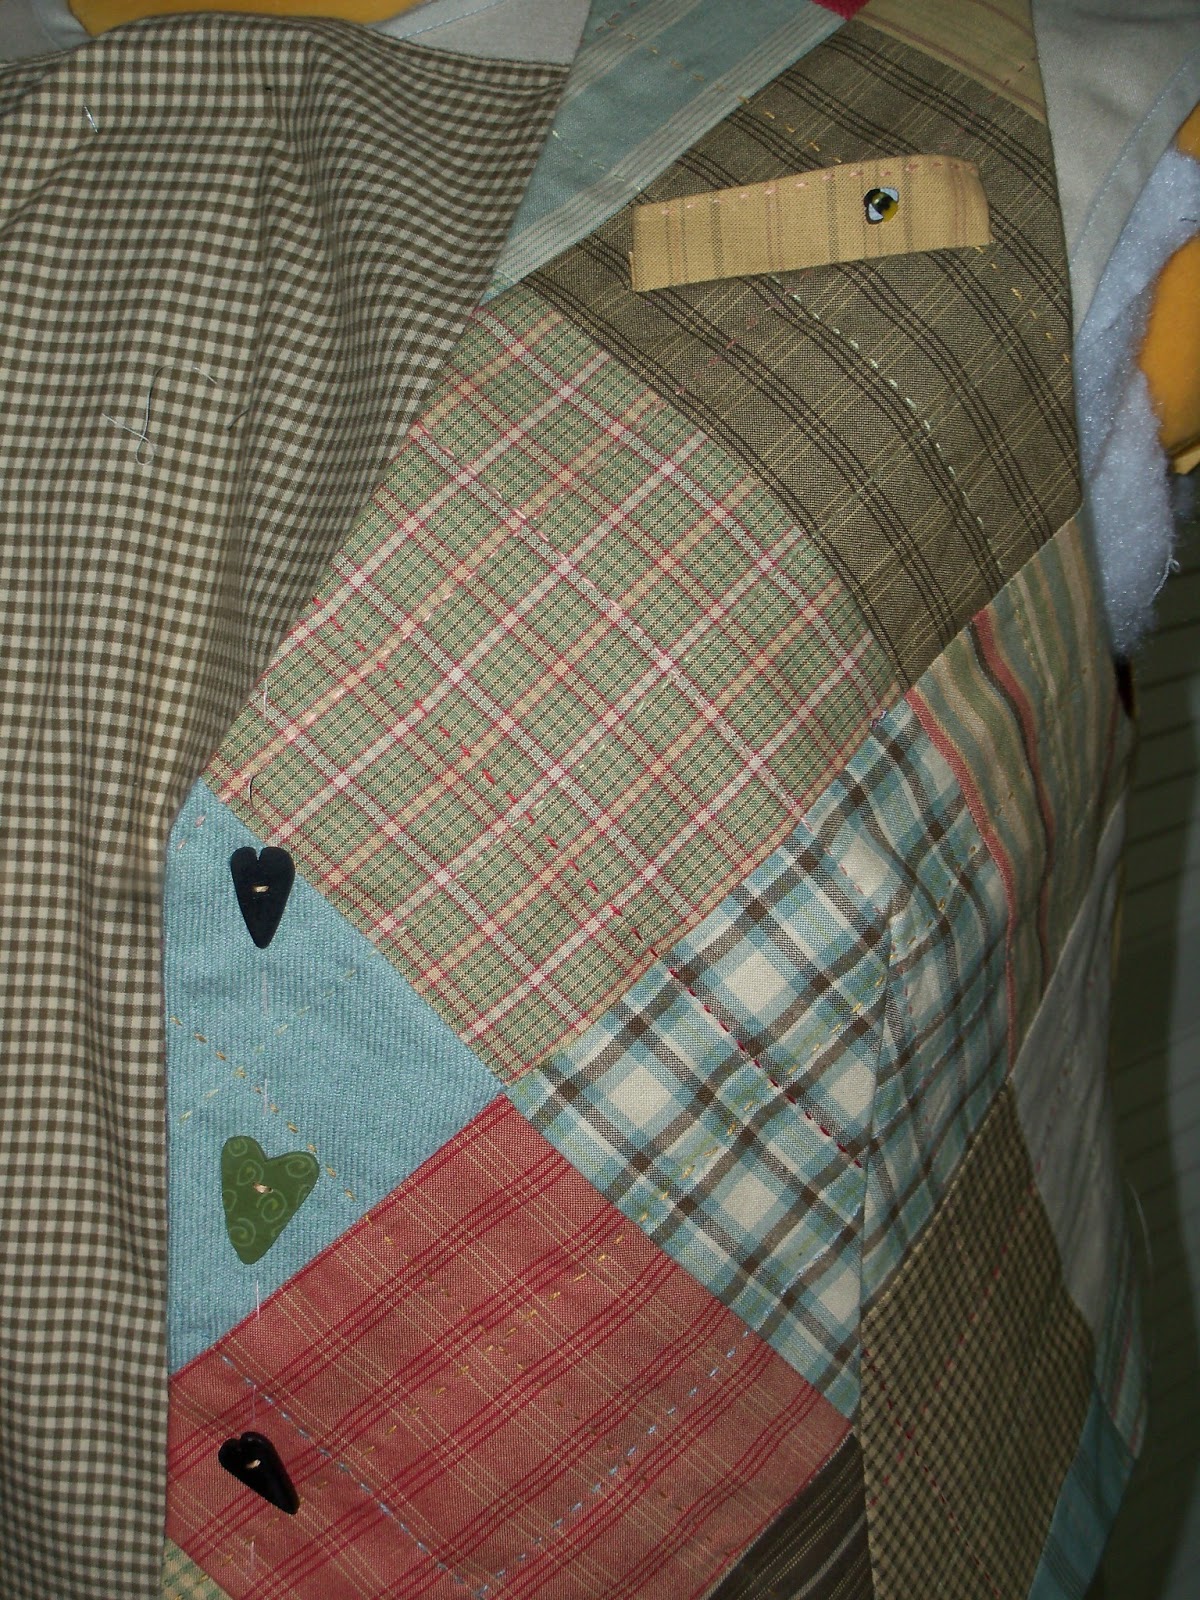
The lapels have a self designed primitive flower quilted on them. Which is echoed on the upper back panel as well.
All of the interior seams are neatly hidden.


I changed the hem line to  swoop in the back.  It's very flattering on and protects my lower back from being exposed to the cold morning air.
You can also see the silk bound shoulder seam from this angle.


The back princess seams open to a lapped vent from waist to hem.
The quilting pattern that runs up the back panel is worked in 3 colors of silk thread - teal, brown, and mint greeen


The cuffs have wool applique, needle felting, embroidery and echo quilting.
The hem is also bound with the silk lining.
The buttonholes are hand worked in a teal silk thread (doubled), something I do not do very often, but I think they add just the right touch here.  Quite a bit more delicate then the pattern suggests, but the entire jacket is delicate I think. 

Here we have my project worksheet..my scanner is out of comissh, so I had to take a picture of it. 
 As you can see this idea was launched in 2007 which I believe was when I purchased the wool fabric at a Minnesota sewing expo.  I officially started sewing on it in August of 2011, put it aside for 4 months and committed to finishing it as my "Git R Done" resolution of 2012
The entire project cost $105.00 

You can see the the progress posts at the links below.

Indygo Jacket - 1st post  you can see the pattern, progress and interior seaming here.
                         2nd post  the hand quilting and sleeve seam finish

This pattern was simple to put together, my additions proved labor intensive though.  Needless to say you could machine quilt your layers, or do a standard lining in it and then it would go together quite quickly.  That having been said , I found it a very suitable pattern for additional embellishment....so you just might want to get creative.  The original instructions are complete and easy to follow.  You may or may not want to amend the sleeve cuff ( see 2nd post) and if you have a full upper arm you will need to adjust your sleeve pattern as you normally would.

Jillybe asked me earlier why I was calling it a "bed jacket" and primarily that is because it was inspired by the lounging pajamas from glamour movies of the 30's and 40s.  In those movies even middle class "broads"
had the must outrageous lounging costumes.  
I just think every women needs just such a garment. 

 Let's crawl out of our sweatpants and slip on something luxurious. We deserve it:)

Related Posts Plugin for WordPress, Blogger...