Sewing Cafe

Patterns, Tutorials and Works in Progress from the Sewing Studio of Lynne Williams

Monday, January 31, 2011

Spring Wardrobe 2011


After much agonizing...really?  I have decided on these fabrics from my stash to sew for Spring. 
  1. Blush silk charmeuse - I plan on converting the collar to a mandarin with a small ruffle and detachable jabot. 
  2. Rayon Lycra - I am thinking this will be a wrap cardigan
  3. Silk Chiffon- I have another piece similar to this, but with a slightly different stripe to combine for a Revisions blouse
  4. Poly Georgette - Although I pasted in a picture of a skirt, what I really want is a 3 tiered knee length number.
  5. Cotton voile- This gorgeous print came from Sawyer Brook and I have some cotton lace trim I dyed for another project which I will be using with it.  The Vogue designer blouse is quite dramatic.
  6. Silk Seersucker- This will be a sleeveless blouse with gathering at the neckline.
  7. Wool plaid - Discovered at Mill End in Eau Claire.  I think it will make a perfect little jumper.
  8. Silk- Again from Sawyer Brook, and it will be a high waisted pencil skirt.  I have enough to add a little jacket as well, but just have not decided on the style.  Any ideas?
  9. Creme Wool Gabardine - Vintage Vogue jacket.  This fabric was purchased from Britex along with the most fabulous cord buttons.  I will be changing the roll line on the jacket to adjust to a 2 button closure instead of 3.
In all honesty I will be thrilled if I manage to get 4 of these items done. This does not even take into consideration casual wear, for which I have some neutral and knits for....Yikes! 

If you have some time and want to be greatly inspired check out the guest palettes at Collette patterns, just click on the Spring Wardrobe Challenge button in the sidebar.  There are some mighty talented woman out there who are planning on looking simply fabulous this spring.
Where do you think I should begin? Do you have a favorite? A least favorite?

Saturday, January 29, 2011

Active Wear - Pink Shirt

Sewing with knits is quick and fun and I can recommend it highly.

This is my 2nd t-shirt for my active wear wardrobe and it is made from a light weight rayon Lycra which I purchased at Sawyer Brook.  Initially I just wanted to add this as an accent color, but.....okay how many other people do this?  To qualify for cheaper shipping I just had to add another 1/2 yard of fabric....what is a girl supposed to do?  spend my money in shipping or fabric?  A no brainer really.

But let us move onto the tutorial.


 I started with the same pattern I used for my navy shirt but I wanted to use a raw edge trim around the neckline and to hem the sleeves and bottom.  I decided to open up the neckline a tad and here you can see where I have removed the seam allowance from my previous "V" neckline.  Once again I simply marked my fabric with dressmakers carbon and then cut along that marked line.


I also wanted to add some length so that it would be ruched over my hips and tummy.  I guess-t-imated an additional 8" which I simply drew on with a chalk wheel.


 After cutting, my first step is to sew my shoulders using a strip of stabilizer.  When I pinned them in place I noticed that I had failed to remove the seam allowance from the back neckline, after having done so to the front.  No worries.....
 I simply took my lovely rotary cutter to it and eyeballed the difference...remember its a t-shirt to work out in

After my shoulders were sewn I trimmed the seam allowance back and left them raw.  I did not want to create a bulky seam by serging or finishing in some other way. 

I used a straight stitch for sewing with my stitch length set just under 2.  This allowed for stretch.  The stretch stitch I used on my yoga pants would have been overkill on such a light knit.


I cut 3 strips of my knits on the lengthwise grain at 3/4" wide.  This is what I used to finish my edges.  With the right sides of the fabrics facing me I placed a strip along the cut edge, zig zagged it in place at a rough 1/4".  I did pull on the strip slightly as I sewed it down. This helped keep the under layer from stretching out on me, as well as causing the knit to curl back down over itself.

In this picture you can see the finished edge after it has curled down, and the lower edge shows the zig zag stitch prior to curling.

Once the sleeves and neckline were "hemmed" I could set my sleeves in, and then sew up my side seams.


At this stage I tried my top on and discovered that while it was looking great, it was longer then I desired even with the ruching I was planning.  I folded up a few inches and then also marked where I wanted the ruching to begin and end.  This resulted in me cutting off 2" from my hemline and deciding I needed 6" of elastic to be sewn into 10" of side seam.

Once the new length was cut I could finish my hemline with my last strip.

I pinned my 6" of clear elastic to each side seam.  At the hem, 10" up from the hem and in between at 5" for the shirt and 3" for the elastic.  Place your pins so that you can remove them easily as you approach them while sewing.


Using my default zig zag begin by anchoring the elastic to the seam line by back stitching.


Then you will need to pull the elastic towards you with your right hand so that it lays smooth on your seam allowance, while with your left hand you pull gently from behind to help it feed correctly.


Can you believe that is all there is to it?  In just a few hours I have a new top to work out in, although I will admit this one would look cute with leggings or some skinny jeans ....as long as I am actively doing something in them right...like actively curled up in a comfy chair with some fabulous and foolish musical, or ridiculously thick novel.

I am now flirting with the idea or trying to get one more top done.  We will just have to see how kind Sunday is to me, meaning how quickly can I get my housework done and get back into the sewing room.


Sunday, January 23, 2011

Ribbon Belt with Vintage Buckle Tutorial


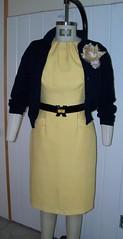
Yellow Silk Dress with sweater Here is my Mad Men Sew Along Dress with a belt mocked up....awaiting the arrival of the correct Navy velvet ribbon

I ordered two pieces of velvet ribbon from MJ Trims while my dress was under construction.  A yard of Navy and a yard of black.  I wanted to make sure the Navy was truly dark enough...it can be difficult to tell these things when ordering on-line.  The navy turned out to be ideal though.  So Lets get started with making a belt from a lovely piece of ribbon.


My vintage buckle appears to be plastic, possibly Bakelite, but I have not tested it or had it appraised.

It is 2-1/4" tall by 2 -3/8" wide  Although the dark part appears to be black in this photo, in reality it is a dark navy.


I cannot recall where I found this beautiful buckle, but apparently I only paid $5.00 for it.  How Fantastic! It may have been years ago but how satisfying to have on hand to finish off my dress.  The back shows you the attachment bars for the belting and my ribbon sitting above it measures 1-7/16"  I need my finished belt to measure 29" and my attachments are 1" apart. I cut my ribbon 31-1/2" so that I have some turn back, an adjustable turn back and seam allowance. Next I cut a piece of light weight buckram 1-3/8" x 29" and a piece of black cotton twill 2" x 31". 
 The buckram will add stiffness to the belt to keep it from collapsing on me while wearing.  They used to make belting for this when covered belts were more often seen, but buckram or heavy craft interfacing will work.


To begin I spray baste my buckram onto the center of my lining, leaving 1/4" on each long side and 1/2" lining on left side with remaining 1-1/2" on the right side.  I fuse 1/4" steam a seam 2 onto the seam allowance of the lining along both long sides.   


Then remove paper backing from one side turn down onto buckram and press. Repeat for the other long side.


With right sides together sew the short ends of the velvet ribbon to the short ends of the lining using a 1/4" seam allowance. Turn right side out.  The seam allowance will naturally want to lay towards the ribbon.  Now I want to make this belt adjustable and so I am adding some 1-1/2" strips of Velcro to the inside of the belt just to the right of the buckle.  My Belt  although in a large loop is in 2 sections, the lined buckram and the ribbon  By sewing my Velcro on now the stitching will not show from the right side.  I sew the male Velcro on first through the buckram and lining only and repeat for the female Velcro 1-1/4" away from the male.


 Once the Velcro is on, I edge stitch the ribbon to the Velcro along the long edges securing the two together.  I then thread my short ends through the buckle attachment bars.  The right side simply Velcro's close while the left side will be stitched by hand to secure.  Notice how the female side of the Velcro is facing...so that the soft side will be rubbing against your clothing.


 Voila!  The completed belt.  My Mad Men Dress is now ready for its public debut.

Have you ever made a belt?

What materials did you use?

Did you know that belts are very much back in style?  ( this is a hint)

Please share your belt making adventure with us.

Saturday, January 22, 2011

Spring Wardrobe Challenge....Say what?

Okay, Okay, I know we are not even through our Active Wear Sew Along, but I just felt I had to mention this Spring Wardrobe Challenge brought to you by Collete Patterns.  If you are not familiar with them here are some of their patterns.   Most of them are vintage inspired and their blog has some nice tutorials as well. 

For a quick link you can always click on the button along the sidebar, this will take you to the latest update on the Challenge.
Now I personnally am looking forward to wearing some spring clothes, and thanks to this challange am already thinking about my color pallete and wardrobe pieces.  That having been said I know that I will not be able to keep up with her 10 week schedule due to work deadlines.  This is not going to stop me from following along though at my own pace, and I encourage you to do the same. 
 On my current agenda is the belt for my Mad Men sew along, which still needs to be made, and after much thought I have decided to complete Chucks Replica Batman Costume as an Anniversery gift.  Some of you may be surprised that he does not have a complete costume... poor man I guess its like the carpenters wife... but that should keep me quite busy for the month of February.  I would like to surprise him...but that is simply not possible.  So you all can look forward to a  Mad Men belt tutorial in the near future along with a costume tutorial, where I will cover the making of the Caped Crime Fighter cape, glove fins, trunks and cowl.

Thursday, January 20, 2011

Active Wear - Yoga Pants 2nd pair

 My first pair of yoga pants are so very comfortable, that I simply want to wear them all the time.  Not possible really, so that made the 2nd pair a  get r' done priority. 

I wanted to add a little pizazz to my 2nd pair and decided on this racing stripe.  It added a little time to the process, but I think it was worth it.  They can still be made in a few hours.

So, lets get to the tutorial.....
The 1st step is to determine how wide I wanted my stripe, and I chose 2.5". 

I created a new cut line on my pattern by coming in from the side seam 1.5" on the front pant, and 1" on the back pant.  I did not divide evenly because I wanted the stripe to favor the front leg a touch.

When I laid my pants out I used dressmakers carbon to mark the new cutting line.


 I then cut the pants out starting at the hem and working my way around to the side seam.  then I removed the pattern and cut along the carbon line. Here you can see me using my rotary cutter to cut along the carbon line.


From my lighter colored Supplex I cut a strip the length of my side seam, 36". The width is my desired width plus 1/4" for my seaming.


Now my seaming is going to be a decorative "flat lock" that my Bernina does which allows for a lot of stretch and a completely flat seam.  Because you lap the seams on top of each other you only need 1/8" seam allowance.  A little scary I realize, but it works well.

Here I have marked my strips with chalk 1/4" from the edge.

 Now I pin my pant leg side seam on top of the strip matching the cut edge of my pant to the chalk line on the strip.  I place my pins so that I can pull them out easily as I approach them while sewing.


To stitch I place the cut edge of my pant side seam along the inside edge of my #1 foot.  Loosen the pressure on your presser foot to prevent the top layer from getting pushed towards you as you sew.  As you can see it is doing in the picture.
 The finished seam lays nice and flat creating no bulk and allowed me to add a nice accent color. 

On my Bernina this stitch is #16 and is called a Honeycomb stitch.  They suggest it for stitching on ribbing for necklines with a decorative touch.

I have a pair of Nike pants that use a flat lock stitch to create a similar look.  My Bernina serger does a flat lock but it does not look the same as the industrial version, so I preferred this.
I simply had to close this post with a picture of the pants with my shoes....pretty matchy...I mean swanky right?  Next on the agenda of course is a hot pink t-shirt, but I have not quite settled on a design for that yet.  Hmm something to ponder while sewing for clients.

If you would like more information on the entire sewing process of these pants, just check out the previous Active Wear Sew Along post.


Tuesday, January 18, 2011

Self Paced Sewing for Saturday

We had great fun on Saturday and as always got a lot accomplished.  Paula and Candy worked on their Active Wear Sew Along pieces using this McCall's pattern # 4261. 

Paula cut out and sewed up a pair of dusty turquoise blue pants to wear over her shorts.  She gets to warm working out in pants, but needed something to get her from the parking lot to the gym, so using this pattern as a "cover up" was just the thing.

Candy made the Capri length pants for her daughter, and the long sleeved t-shirt as well.  Both were cut out and the pants completed before the end of the day.  She even started sewing her top.  The directions call for the neckline to be turned and hemmed....curious I thought and so I had Candy cut a strip 11/4" wide to bind it with instead.
These are Candy's fabrics.  The solid purple was used for her top and the print was used for the pants.  The print is a tricot spandex, often used to make bathing suits,  and the solid  is a rayon Lycra.
Both of these were purchased at Jo Ann's.

Her one pattern change was to replace the drawstring waistband with a wider elastic one, which was sewn in.

Paula promises us pictures of her finished pants, but she is off to LA, so we will need to be patient.  I apologize that I missed getting pictures of Candy's pants....but it does get a bit busy in class, and is not always conducive to picture taking.


George has returned and is looking for some inspiration and companionship to get him through the long winter.  This is one reason why Sewing Cafe is so great....its a motivating and inspirational.  We really get a lot of support and encouragement from one another.

George started this shirt this summer, and during class he installed both of his sleeves, learning two different techniques. 
     1. Setting the sleeve in before sewing the side seams, as I did with my navy t-shirt for the active wear sew along.
     2. Sewing the sides seams first and then setting the sleeve.

 As a advanced beginner sewer, he found the 2nd technique easier.  This shirt pattern has a nicely fitted sleeve with no additional ease at the cap, but the cap height is a little higher then I usually recommend for the 1st technique.  He got both sleeves in beautifully, but just felt the 2nd was easier.  I believe he is down to his hems now and he will be on to the next project.  Hmmm. I wonder what that will be? 

Judy joined us as well, and as per her usual style knocked out several projects.  I believe she made 3 pillow covers from 3 different fabrics, this one at right being one of them.  Ireally liked this cotton print...the other two were done before I had a moment to look up..the sly girl.

Once her pillows were covered she started in on a quilt kit from Karen's Quilt Corner.  Judy expressed some skepticism at its claim of only taking 3-4 hours to sew up....but indeed she had it all cut out and mostly sewn up before the end of day...well under 4 hours!  Not a bad days sewing at all!  She also had the pleasure of working on a loaner Bernina for the day.  Her old, and I do mean old Pfaff has finally sewn its last stitch...what a trooper and so Judy is taking the Bernina out for a test drive.  We get a bit of a thrill when someone gets a new machine.  I am curious about this because we all like our old machines so much....but a new tool, is a new tool.

B5307
Cute right!  Our new beginner student Sarah has chosen this dress as her first exploration of dressmaking from a pattern!  Exciting I know!
Did she learn a lot in a half day of sewing?  You be the judge, she learned"
  1. How to choose the correct pattern size
  2. How to understand the pattern envelope
  3. How to locate her pattern pieces
  4. How to take her measurements
  5. How to do a FBA!
  6. How to alter the pattern for design changes...more on that one later
  7. How to read the lay out instructions and then why you sometimes have to just ignore them-lol
  8. How to cut and then mark her pattern pieces correctly.
So about those design changes.  After purchasing the pattern Sarah was concerned that the gathers over the tummy would be unsightly.  She wanted the fullness at the hem, just not at the waist, at least not quite so much.  When we measured the pattern along the top of the skirt it had over 2x the fullness..that is great for a children's dress, but a bit much for an adult, especially when making it from cotton.  So she learned how to slash her pattern to reduce the fullness.  She created 4 lengthwise cuts that ran from the waist to the hem, leaving a little hinge along that hemline.  Then she overlapped the strips at the waistline reducing it by 7 inches all together.  She will still have some gathers, but this created a more A-line skirt. 

This is one of her two fabric choices for this pattern.  The pink being used for the contrast midriff and band.  Love the batik, but then I always do.
I think that catches us up for this week.  Hope you all get to do some more sewing this week, but there is always our next Saturday class on the 26th.  See you then.

Sunday, January 16, 2011

Active Wear - Navy Shirt part 2


I should give a prize to the person who can figure out what this is a picture of, right?  Well the first clue is that its part of a shirt....after all that is the title of the post.

Okay enough foolishness.  It's a sleeve pinned into the bodice.  I decided to sew the sleeve in prior to sewing the underarm, because although the cap height seems a little tall for this method, its a knit, and a stretchy one at that.  So I pinned it at the underarm, notches, and shoulder seam.  I sewed it in with the sleeve side up and while matching my cut edge sewed around the curve.  


 After sewing the sleeves in I over locked them and moved onto the side seams.  Before over locking my side seams I tried the shirt on to check the fit.  Hmmmm...surprisingly the underarm felt low especially for a work out shirt.  I am surprised by this because remember in my first post I mentioned that I started with a size smaller then usual? 

The solution at this point was you can see at left.  The over locked seam is the sleeve seam.  I brought my side seam in 3/4" tapering it to the sleeve hem and to the bust in the other direction.  This worked like a champ, and I was then able to over lock it as well.  I hemmed the sleeves and bottom as I did for the yoga pants.


 Well this is great I have a nice snug t-shirt in a lovely shade of blue, but honestly its a little boring.  Here comes the fun, at least it was for me, but I seem to have a undeniable need to complicate every project...at least a little.  I mean if a well fitting t-shirt made from stash fabric isn't enough, that I feel compelled to jazz it up in some way, does this make me greedy? or a creative genius?


My husband and I had the opportunity not only to see the original Batman and Robin costumes from the 66 Batman TV show but we were allowed to try them on! Did I mention that my husband is a huge fan of the show..and that we make replica bat cowl for people? Needless to say this created quite a photo opportunity for us and our dear friend Mark Hardeman snapped a pic that has become a favorite of mine. Now enters another friend Scott Sebring who is a wiz on Illustrator, he very kindly produced this seal of approval using the aforementioned picture.  I printed it out on a ink jet fabric sheet.


After printing I ironed it to help set the ink and peeled the paper backing off.  Then I applied misty fuse to the back and carefully cut it our around the zig zags. Next I ironed it onto the shirt.  Now....it has yet to be seen how well this technique will hold up through multiple washings, but I sure like the results and it makes for an interesting experiment.


This final picture shows my complete 66' Batman workout wear!  Its Williams Studio 2 approved! lol.  I have more pieces to add to my work out wardrobe, but this should certainly brighten up the 6am cardio routine.  Thanks for joining me while I sew, and tomorrow I will post the latest class progress.

Friday, January 14, 2011

Active Wear - Navy Shirt

 To start altering my t-shirt pattern I took measurements off of this favorite t-shirt of mine.  I measured the:
     Bust-32.5
     Waist - 27
     Hem - 33"
     Center Back length - 22"
     Bicep - 10"
     Sleeve length - 6.25"
     Depth of neckline - 5.5"

I compared these to my pattern to determine the needed alterations.  Here you can see a fine example of negative ease, as these measurements are approximately 4" smaller in circumference then me, yet the fabric stretches to fit. The sports bra helps as well. lol


The bust on the size 10 measures 33" and on the size 8 it measured
32.  I normally start with a size 12 so I decided on the 10.  The 8 just sounded so small....
The waist on the pattern was a little roomy for my taste  at 30"and so to make it like my favorite t-shirt above I need to remove 3" in total circumference. The hem line was larger as well by that same amount.
This means I need to divide my 3" I want to remove by my 4 side seams.  That equals 3/4".  The red line on the pattern side seam at right shows how I drew that in and blended it back out at the bust. 

The back pattern piece surprised me with a seam down the back.  Curious I thought and completely unnecessary so I drew in a new center back line placing it on the fold and repeated the changes from the front side seam onto the back.

The lengths were all the same as my favorite t-shirt so no changes there.


I prefer a v-neck line although it is a little more difficult to sew, its more flattering to the shape of my face.  It mimics my pointy chin and narrow little head causing them to look more harmonious. 

Here you will see where I drew in a v-neck line onto my pattern.  I will not cut off the original neckline though as I might want to use it in the future, or modify it in some other way. 

To determine the depth I used the measurements from my favorite t-shirt again.

This does mean I will need to construct my neck binding differently then the pattern calls for.


 To begin my neck binding, I determine that I want it to finish at 3/4"(yet another measurement taken from my favorite tee)  I add my 5/8" seam allowance and double it because the binding is on the fold.  I believe this gives me 3".  Now for the length of my binding I measure my neck edge along the stitch line.  This leaves me with a 3" by 24" rectangle....which I promptly cut out and press in half lengthwise. 

To cut the correct angle on my binding strip, which causes it to lay flat at the center front.  I mark my stitch line with chalk, place my pattern piece matching my cut line on the pattern to the stitch line on the binding, and then cut the binding parallel to the center front fold line.  Now cut the opposing end of the binding to match.

 Here my binding has been opened out flat, so that I can sew the 2 ends together.  After sewing I clip all the way into the point, trim out the seam allowance.  Press the seam allowance open and refold the binding.


Here you can see my binding ready to be sewn into my neckline.  But first I must sew the shoulder seams together, which I do using my stretch stitch and staying with a sheer strip.  After over locking I am ready to finish my neck edge.

Before I can sew my binding in I mark the stitch line with chalk at the center front.  This cross mark is where I will need to pin the point of my binding at the stitch line.  I also mark the center back of my neck as well as the binding.  With right sides together I begin sewing at the center back and work my way around pivoting at the center front cross mark.  I need to snip in with my scissors once I reach this point to prevent catching any tucks on my shirt.

Once my binding is in I over lock it as well and then I top stitch to keep the seam allowance from wanting to flip around on me. 

To do my top stitching I return to a normal straight stitch with the length set at 2.  I like to use my #5 foot which has this guide running down the center.  I move my needle position all the way to the left and stitch with the edge of the seam against the guide.  My seam allowance is laying underneath and to the left. 

Next I will set in the sleeves and add some fun, so stay tuned.

Wonder Woman Tiara

 This is rather satisfying as the completion of any project is, but some are longer in the realization then others.  The Tiara appears to be simple enough especially in comparison to the rest of the costume.  But with replicas its all about finding the correct dimensions, curves, proportions, and scale, where I am not the decider but the replicator... The fun part is trying to understand why the designer, pattern maker, and sample maker made the choices they did and learning from that.  I also can't help wondering how the wardrobe department managed to keep track of this piece of the costume day after day.  Donfeld speaks of being dismayed by it getting junked up with hairspray and commenting to the makeup dept. about this. Now that I made this little lovely, I can appreciate that as well.
 While Chuck and I were taking pictures of it you gain respect for the lighting and camera people who managed to film this successfully.  A lot of light bounces off of this baby and creates some major hot spots.

 This is what the inside looks like.  I caught a glimpse of this on a YouTube video where Lynda Carter pulls her Tiara out of a display case. It looks surprisingly soft and delicate in her hands and you can see the gold edge turned to the inside along with the elastic across the back.

Laying out flat on my pattern table, which gives you an indication of its true dimensions. 

This is my favorite shot in the group.  I do like my closeups.  You can appreciate the grain of the leather, the depth of the rhinestone, the proportions of the star to the peak, the metallic braid which frames it all, and yes more beads.  Its so perfectly girly and hero like, don't you think?
Related Posts Plugin for WordPress, Blogger...