Sewing Cafe

Patterns, Tutorials and Works in Progress from the Sewing Studio of Lynne Williams

Saturday, February 26, 2011

Batman Glove Tutorial - Part 2

This is the 2nd tutorial on making/ finishing the gauntlet portion of the Batman gloves.  The 1st tutorial is on making the perfect fins.  You know, now that I think about it, this project might explain the blue post, then again maybe not.... Let's proceed shall we?

To begin with you need to determine the length of your gauntlet.  Chuck wanted his to end 10" from the leather palm. 

With chalk I marked this spot  1/2" in from the side seam(where the fins are inserted) and then the 10".  This left about a 1" seam allowance from the top edge, which I continued to mark around to my other side seam.
The top edge of the original glove is finished with 5/8" wide twill tape.  This tape stabilizes the top of the gauntlet keeping it from stretching. 

Start the tape just beyond your X mark and pin it just above your top chalk line.


Here you can see the entire top edge of the glove pinned.  It is important that you pin this as it lays flat on the table.  As you are sewing it the Gauntlet fabric will want to stretch on you, which you want the twill tape to prevent.

Stitch this about 1/8" from the top edge of the tape.


 After its sewn. Trim your gauntlet seam allowance to 1/4" and press the tape towards the seam allowance.

Press again rolling the tape to the inside of the gauntlet.  Pin and sew 3/8" from the top catching  the tape as you sew


Your finished top edge should look like this.


The horizontal line you see at left it the finished gauntlet edge.  The fins are placed onto the template. I trim off the seam allowance so that it leaves 1/2".


 The first fin is placed 7/8" from the top of the gauntlet.  On Chucks I placed the remaining fins 1" apart along the 1/2" seam allowance.  Your amount in between may be different if your gauntlet length is longer or shorter. 

Pin securely, because these will want to move on you as you sew them in due to the uneven thickness.

Now sandwich the fins between the two side seams, pin some more between the fins and make sure your top matches exactly, with right sides together sew at 1/2"
 Pretty sweet right?  The fins are in and the top of the gauntlet comes to a nice point.  But you still need to tame the seam allowance there.
To tame that seam allowance you must trim back it back carefully.  Fold the top edge of your seam allowance under so it matches the top of the gauntlet and hand sew to secure and tame.

This is precisely the way the gauntlets were finished on Adams gloves.  A pair of which I had the great pleasure of seeing from Mark Hardeman's collection.

I hope this tutorial helps you to realize your dream of having a pair of replica Batman gloves.

Wednesday, February 23, 2011

Blue News, Inspiration and free shipping

The recent news from Nicolet is that this Saturdays(2-26-11) Sewing Cafe class has been canceled :(   I am still waiting to hear about Marches Friday sessions. 

So I will admit to feeling blue about this, which led to my being drawn to .....

Blue Buttons.....

Now that I am selling some items on Etsy, I have been doing more shopping there and thought I would expose you to the wonderful world of artisans to be found.


Paperpeacock

"These are so sweet with a pale water blue center, and pale avocado edge with robin egg blue dots. "
Each measures 1 1/8" inches.  The set of 3 retails for $15.00 
 Click on the link above to get yours today or to see the other beautiful buttons and items she makes from her Michigan home.
 Another blue button.....

This next button is from LeAnn at Unique Buttons and she is offering free shipping to anyone who mentions Sewing Cafe when they place their first order!!  Thanks LeAnn
Unique Buttons "My buttons are handmade one at a time in my studio
Beautifully painted art glazes on this button ~just the right mix of 2 shades of Blue
Size ~ 1.25" diameter ~ one button as shown
Perfect for that special garment ~ sweater, jacket, shawl, scarf ~ or let your imagination and creativity guide you. If you need a special color, e-mail me.
These buttons can be washed on the gentle cycle with the garment turned inside out or hand washed. They are one of a kind and each button will vary in design.

Can you tell I am ready for spring ...even spring showers?  Here is a little inspiration in blue, which makes me feel a lot less blue and has started me daydreaming about ..... red shoes if I were to tell the truth.


What is not to love about this gorgeous dress?  Its a gingham...in teal and black....has rhinestone buckles....and could not be more flattering!  Its a vintage 50's dress beautifully made, kept and photographed.  LOVE IT. 

To wear this dress in Wisconsin would require a wrap of some nature...closed possibly with a ceramic button?  White fur perhaps?  What are your thoughts.

Where would you like to use those buttons?  A jacket, purse, pillow or....? Do tell.


Monday, February 21, 2011

Wonder Woman Cape - Seeing Stars

 There are a lot of stars on the Wonder Woman cape.  92 was my last count!  That's a lot of stars.

I spent the day pouring over reference pictures and carefully plotting out the complete star pattern onto the cape.  The striped side is easier as the color seperation kind of creates a graph for you to identify the placement.  The red side on the other hand is a little more difficult, because they are just floating in this very large field of red. 

I did not realize when I began that there were small blue stars on the cape, so they are represented by some cut outs that I made from the blue muslin.  In addition there is one large blue star which I also did not spot until today. 

The stars are still only pinned in place. My goal for tomorrow is to get them all attached.
Each star gets a sequin held on by a seed bead.


A knot is tied on the back.  Do you see my poor needle? it was not meant to sew through iron on adheasive, poor thing. 

 This batch is for the red side, with a few blue ones missing in action.  I was rather surprised by the number of red stars.  They are hard to spot in the reference due to the red on red issue, but the highlight of the sequin revealed their locations.

Whew! that's a lot of stars, but they do make her look fabulous.

Saturday, February 19, 2011

Wonder Woman Cape

 My sentiments exactly Edna! 

Capes are deceptively simple looking items, and yet they are not really simple at all.  Lots of seams on this one inparticular and flat fell seams at that.  Each seam gets stitched 3 times and pressed aggressively 4 times.  This one is quite slippery and the more segments you add to it, the more it wants to lay on the floor and not on my sewing table.  Its like holding liquid without a cup. 
 But of course its that fluidity which makes it move so beautifully during a spin say....
 Chuck is excited to see this replica cape sewn up and on the form, but no more then I am.  It still needs its hem and of course the stars, its not really a Wonder Woman cape without those.
The cape on the floor is my muslin with the beginning of the star pattern laid out.  Its not complete, but I felt complete enough for me to feel comfortable with the proportions.  Monday I will begin applying the stars, if I can get them all sequined in time.  This should keep me occupied while the hem is dropping out in preparation for sewing.

Friday, February 18, 2011

Mad Cowl Disease

Chuck calls this picture "The Birthing"  The birthing of 8 fiberglass forms which after much care and attention will grow up to be full fledged Bat Cowls.

So this is what all the stink is about...literally!  Chuck has been putting a lot of hours in molding, cleaning and trimming these baby's.  Over the past two weeks, whenever I leave the studio he would start casting.  The smell is pretty unbearable and requires that he has the air scrubber going and his ventilation mask on, but he does not like subjecting me to the residual fumes.


 The cowl covers have all been cut out and are now ready for me to sew them all up.

Once they are sewn and pressed very carefully, Chuck applies them to the fiberglass form.

Once the form is covered I sew the ears on, along with the front flaps, snaps and label.

Then they go back into Chuck's studio to be painted


This is a completed Cowl, ready for its new home and happy family....


...and here is Chuck aka Batman telling us WE are not serious.  The nerve! 


More on this project later bat fans, so stay tuned for our next installment, "How to make your husband happy with a cape and gloves" or " Holy huge scallops Batman"

Tuesday, February 15, 2011

Saturdays Sewing Cafe

As per usual Saturdays Sewing Cafe proved to be inspirational, productive and fun. It began with Sarah arriving first thing in the morning, excited to get to her sewing. Last time we were together Sarah had cut out her very first dress and learned about the tedium (some people think its tedious) of correctly marking all of her dots and notches. She bravely muscled through it but was really looking forward to the actual sewing part...you know the part that makes you feel like you might actually have a garment someday? The first thing she got to sew was 4 darts, 2 for the bodice and another 2 for the lining. Because we had done a fba for her and the bodice ends just below the bust line this created a very abrupt pointy dart....completely undesirable. 

The solution requires curving the dart legs.  The pencil line in this picture represents the original dart legs and the red line represents the required change.  This softens the shape and provides for a fuller bust.

Candy arrived next....very unusual as she usually arrives before I do, in fact when I didn't see her car parked out front, I wondered if I had the right day.  Seriously-lol 
But it was the right day and she was eager to make some progress on her winter coat...it is warming up you know?  She made great progress, setting her sleeves attaching her collars, then sewing her lining in.  Quite remarkable progress.

In the afternoon, we had 2 new Learn to Sew students arrive along with George.  George finished up the sleeves on his shirt, and got the hemming done.  His shirt reminds me of  the Lone Ranger


It is this same style but in a nice cream twill and without the welt pockets.  George is planning on tackling a corduroy sports coat next.  How exciting is that?

Our two new students a mother daughter team, Jessica and Susan learned how to use their machines, about the basic notions and supplies and how to sew and press a proper seam.  Once they had the basics down Jessica started on a dog jacket from a pattern by Green Pepper.  Interestingly she chose a leopard printed minky I have had my eye on for a hoodie, I kept trying to figure out how to work it into my active wear wardrobe, even though the colors were wrong.  I am not sure how I feel about the fact that its now keeping some nice family dog warm and cute...r.  Susan is a triathlete and wants to make a t-shirt quilt using all of her racing T's.  Fun!!

Elizabeth arrived mid-morning and I was completely out of the loop on what her days projects was going to be, but I knew she would surprise and charm us.  Her beau is a Star Wars fan, and he has a family member who is due to have a child of undetermined sex soon.  In enters Elizabeth and her keen desire for a unique gift.  One of her sewing books suggested appliqueing t-shirts for children, which she found perfectly charming..because it is, but of course now we need to tie in the Star Wars theme...right?  Of course.  After a brief artistic consultation, our designer produced these:
Now you know that if Elizabeth is involved a book is sure to follow.  So here you see the inspiration for these adorable onsies.  Each letter represents a planet in the "Star Wars" galaxy.  Can you guess which ones?  I will get you started, A is for Alderon...E is for_______________?

Using her Bernina machine she stategically stitched the name of each planet onto her fabric to create a cute patch. 

Well that's it for this weeks Sewing Cafe at Nicolet.  Our next Saturday class will be held on the 26th, and don't forget to sign up by this Thursday the 17th.

Friday, February 11, 2011

Student progress

 Technically this young girl is not one of my students, but I could not resist sharing a picture that Elizabeth shared with me. 

Elizabeth is mentoring this young girl in the art of sewing.  Here she is proudly displaying a very fancy sleep mask and her1st project the apron with a personal and unique pocket design.

It's a good feeling isn't it to see the smile that only making something yourself can bring.  Good job Elizabeth for sharing your skills with someone else. 

Check the schools where you live to see if they also offer a mentoring program.  You too could be sharing your sewing skills with an interested youth.  4-H also provides the opportunity for volunteering to teach sewing.
 Paula completed her drawstring active wear pants.  These pants were made using McCalls 4261, and they were easily completed during class time. 

Seeing as how Paula works out everyday I can only imagine how much of a work out these pants will get.


She is back from LA and looking forward to sharing her new fabric purchases with us. That will be something else to look forward to.


She also completed her skirt that she had started before leaving on her trip.  Thanks Paula for taking these pictures for us.

The skirt appears to be a linen color here, but its actually a silvery grey.  It has some lovely seaming to it which is reminiscent of a 30's bias gown, and its that seaming which provides the gracful sweep to the skirt.  We did have to alter the length of this skirt which was a bit tricky because of the circular shape of the pattern piece, but it looks like it turned out nicely. 


Peg is headed off to Daytona for her annual trip.  She made this bag for her knitting projects...its quite the satchel!  She modified an existing pattern adding the zippered closure, the dowls at the top, and the exteriour pocket.  She free motion quilted the canvas


 As always customized her zipper fob, and you gotta love the triangular tab...now thats going the extra distance yes?
Had to have a shot of her additional pockets inside.  This Satchel took her 3 full days to sew and its a beautiful example of Pegs work.  She loves designing, customizing and problem solving her way through all kinds of bags, totes, book covers, and organizers.


Great work to one and all!!

Saturday's class is sure to provide more inspiration and hopefully some additional pictures.

Tuesday, February 8, 2011

Fin-ished! - Batman glove tutorial


Warning it can be dangerous to swim with sharks......
My innocent pattern weight picked up this rejected fin, a match that could only be made in the studio

But let's get on with learning how to make perfectly pointy fins for our Bat gloves.


A is for Accuracy....seriously you need to pay careful attention to the details.

The first is your grain line.  The ribbed texture you can see on the wrong side of the fabric is the cross grain(stretch).  The yellow is indicating that, but it is not aligned quite right as the right end is slanting down a bit.  Can you see it?

I created a copy of the fin pattern piece using template plastic.  Your pattern piece should not have any seam allowance on it.  Trace around the pattern with a fine(that's important) sharpy.

Equally important is making sure that the cross grain runs straight across the tip of your fin.  Remember there is no stretch on the lengthwise grain.


 I only mark one side of my fin, cut around it leaving a 1/4" seam allowance on the curved sides, and 1/2" along the bottom/straight edge.  Then I pin it right side together with my fabric and cut the other to match the first.  The pen line is your stitch line, and you only need it marked on one side

All 3 fins are the same, but they are placed into the gauntlet at different depths, and angles.  You will also notice that they are not...I repeat not interfaced.  This surprised me when I observed it on the original set. 

The Williams Studio 2 pattern will provide you with a template for the proper placement, as well as angle and depth for each fin.  You can make 3 separate fin patterns based on that template, or you can make 1 pattern and adjust after sewing.


If you choose to make 3 patterns I recommend you notch each fin, once, twice, or 3x to indicate its position on the gauntlet.  Little snips as seen here will do the trick nicely


 Set your machine up with a sharp #10 needle and set the stitch length to just below 2. A small stitch helps you sew with better accuracy around curves and especially around the tip of the fin. Stitch along the inside edge of your stitch line another point of accuracy. 


When you get to the tip, put your needle down and pivot one stitch across the tip, with needle down pivot again to continue along your stitch line. You are stitching only along your curved edges, keeping the bottom open for turning.


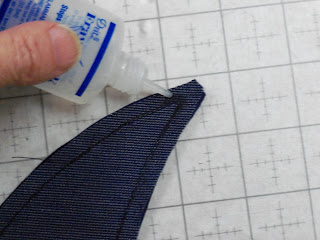
Fray Check both sides of each tip around the outside edge of stitching.  This prevents the fabric from fraying out after you clip and turn.
You will need a quality point board for this next step.
  
                                 
After pressing your fin flat to marry the stitches into the fabric, place it onto a point board and press your seams open.


Trim back your seam allowance at the tip very close to the stitching.  Don't try to trim both seam allowances together, but trim them individually, so that you can see where the stitching is.  I can highly recommend reading glasses for this and the following steps.


Put your index finger inside the fin and pinch the fabric in between with your thumb....
 Invert the fin over your thumb.

 I imagine that if you had lovely tapered thumbs you will have greater success with this step then I do, but it works all the same.

                                                                              
                                                                                  .

Very carefully use the point of your closed embroidery scissors, or a small knitting needle to push out the tip until it looks like this


 Again very carefully take a sturdy pin and pry up the point a bit more until you see your full tip.


Now for the pressing.  This 1st step may surprise you, but you want to flatten your  tip aggressively.  With the inside curved seam facing you and the outer curved seam  directly underneath it, lay it down on a clapper, or piece of hard wood.
Press just the tip with a hot iron and count to ...at least 5. 
 Pressing on top of the wood will really flatten your seam
 and smooth out the bulk in the tip.
Press your fin again this time to finish.  You need to have 6 finished fins.  Chuck has two sets of gloves and so I made 12 fins.  Actually I made about 18 fins to end up with my required 12. 
Allow yourself the same kind of wiggle room.  Sometimes despite all your best efforts you get less then the desired finish that you want.  Make some extra and then pick out your favorites.  In my case I make extra and Chuck picks out his favorites.-lol 


 Chucks chosen fins.

I hope that this tutorial has been helpful to you.  Even if you never make fins for Batman gloves these pointers should prove helpful for making tight corners or collar points with stretch fabrics. 
Related Posts Plugin for WordPress, Blogger...