Sewing Cafe

Patterns, Tutorials and Works in Progress from the Sewing Studio of Lynne Williams
Showing posts with label Batman. Show all posts

Thursday, July 4, 2013

66' Replica to Cosplay Batman Cowl Comparison

66' Batman Cowls Unite

Assortment of 66 Batman Cowls with flash photography

Chuck says " One of these things is not like the others"  


Assortment of 66 Batman Cowl with out flash photography

Can you spot the 66' Replica Cowl in these pictures?
The third one from the left is our replica made from the same fabric as the original . 
 The other 3 are are our Cosplay cowls made from Satin Spandex.


Replica and Cosplay 66 Batman Cowls


The replica cowl (3rd from the right) still needs its flaps and ears while the Cosplay cowls are ready for  the paint dept (Chucks studio). 
 The Cosplay cowl has a faced front flap, not as authentic as the Replica but a nice clean finish.  
The light blue swatches of fabric on the flap covers the Velcro to protect from snags.

So while Chuck is painting tomorrow I will be sewing flaps, ears, and a banana:)
Hopefully everything will go smoothly and these beauties will be flying out of the studio shortly.


Saturday, February 23, 2013

Couture Inspiration - Valentino


Last night my husband and I watched Valentino.  
It's beautiful, educational and inspirational.
A glimpse inside fashion history and an amazing working relationship
Fabulous scenes of France and Italy

It had me re-thinking almost every sewing plan I have and made me desperate to vacation somewhere with a fabric store and cafe-lol

We were snowed in again yesterday about 6" of a rain/snow mix which did allow me to get some cowls sewn up

 and dream about a winter white jacket I wish to make or slacks...
What about that blue silk batik top... the black leather spencer...the wool circle skirt with tear drop hem and oh yes I still need to finish my lovely butter colored silk chiffon revision blouse.

What will you be sewing today?


Thursday, February 21, 2013

Sewing Studio - Bat Cowls


We have had a recent flurry of orders for Bat Cowls and so today I began cutting a batch out.
You may notice my new toy on the table...a Nook
Love my Nook!
 I have pattern books loaded on it, very helpful, but today I listened and glanced at Susan Khalje Couture Dress class.  
Yesterday it was Claire Schaeffers couture techniques.  
Are you recognizing a theme?
 I will admit that I am treating myself to Susan's class and actually making myself the dress. 
My muslin is all prepared when what to my horror did I discover...I am completely out of silk organza!!  How did that happen?  
While I wait for its arrival I have plenty of work to do, which I am very grateful for, but it does interfere with my personal projects- lol

Hope you all are enjoying your sewing:)

Saturday, October 6, 2012

Replica 66 Robin Costume

  
This Replica Robin costume found a new home in our fitting room this week when Chuck scored this perfectly sized mannequin to display it on.
I made the costume using our Williams Studio 2 patterns #WS1001, available for sale at Williams Studio 2.com and the Etsy store.
The patterns were created by myself after having access to an original costume from the Hardeman Collection.

This picture shows the original costume owned by Mark Hardeman with our fabric sample laying on top for comparison.


Had to throw in a picture of the mask.  
This one is made from wool just like the one in the Hardeman Collection.
 These can also be purchased thru the Etsy store in a polyester gaberdine, the fabric that Burt Ward says his were made from due to the fact that he was allergic to wool.


Tuesday, April 10, 2012

Congrats to Adam West - Our Favorite Caped Crime Fighter

Had to share this!


Adam West just received a star on Hollywood Blvd.  

Congratulations Adam!

We are honored as well to see our Replica Batman Cowl there as well.  

Thanks to our client Scott Sebring for representing:)

We have now been making these cowl for over 6 years and have had the pleasure of mailing them out all over the world to fans of the 66 Batman TV show.  


If you are not familiar with the series or have not seen it since its original airing in 1966 enjoy this first episode "Hi Diddle Riddle" and learn what "camp" is all about.

Friday, January 27, 2012

Caped Crime Fighter - Dart & Godet tutorial

This tutorial covers the sewing directions on the WS1002 Caped Crime Fighter Pattern under
 "Cowl Sewing Instructions" steps 2-7


This is how your side Cowl #5 will look after cutting out and marking the darts and Godet cutting line. Cut along the Godet cutting lines an inch or two.
Do not cut any deeper until after the darts are sewn.


Step #2
Fold the darts with right sides together down the center and place pins at each end.
To insure your darts are accurately sewn.  Pierce the fabric with your pin along the front stitch line and straight through to the back stitch line as shown.

Continue to pin along your dart stitch line and then sew from one end to the other.


Always press your dart flat first being careful to not press beyond the point, which would cause the dreaded dimple. 
 Once the dart is pressed flat you will press the dart that leads into the godet towards the front of the cowl.  The lower dart which touches the hem line will be pressed towards the back of the cowl.


 Step #4 & 5
Moving onto the godet piece #7 - It is important that you mark the dot located at the apex of the godet. 
You will notice that one side of the godet is slightly shorter then the other.  The longer edge gets sewn to the longer/leading godet cut line.  
You can now cut the godet cut line to within 1/2" of your sewn dart.


With right sides together pin the dot on the Godet #7 to the very end of your sewn dart.


Place another pin at the bottom edge matching the cut line.  
The cut line will not match along the entire edge. 
Sew from the dot  maintaining  a 1/2" seam allowance along  your Godet cut edge.  Your bottom edge may or may not match depending on the accuracy of your cutting and dart sewing, but don't worry if its a little short or long, this will get trimmed when you finish the hem edge.


This is what you seam line will look like from the cowl side once sewn.  


I realize this part is scary...but you will now continue cutting along your godet cutting line right up to the end of your dart and beginning of your godet stitch line.


Step #6 

Flip it over so your right sides match again and the opposing cutting line is "matched up with your opposite godet edge.  You will pin as you did the first, matching the cut lines at the bottom.  Sew from the top to the bottom maintaining your 1/2" seam allowance along the godet only.  The godet cut line will have a very narrow seam allowance at the top gradually ending in the 1/2" at the bottom.  Here you can see that my hem lines don't quite match...no worries because remember you will be trimming that when you finish the hem.


Step #7

Press the godet from the right side making sure the seam allowance is laying nice and flat.
From the right side then stitch in the ditch along the edge of the dart grabbing the top tip of the godet to secure.

Now repeat for the other side and your side cowl pieces will be ready to sew to  your center cowl piece.  

Please leave a comment if you have any questions and I will respond back as soon as possible.

Hope you have enjoyed learning a new skill:)

Wednesday, January 4, 2012

The Dark Knit

 The Bat Saga begins
I hope all of my readers are aware of my husbands love for the 66 Batman T.V. show with Adam West.
His desire for a replica costume began when he was a small boy..in fact he remembers finding "Batman blue" fabric in a local store, but alas his mother could not sew:(  so no bat suit for little Chuck.

Many years later he marries yours truly and the quest for the absolute replica bat suit began in earnest, after all his new wife knows how to sew....


Chucks favorite picture of Lynne in the Bat Cowl
 Little did I know how much this project would impact our lives...who would have guessed?
Since we began this saga we have purchased 100's of yards of fabric, viewed countless blue satin swatches, created patterns, worn the original suits ( thanks Mark Hardeman), met other fans of the show and have sold dozens of cowls all over the world. 

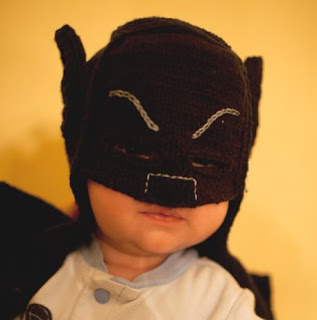
So naturally, when a beloved client of ours announced that his wife was pregnant with their first child.....we decided this special baby must have a Bat Cowl of his very own....Naturally:)
Picture of a very good baby, no screaming or nothing..ahh

 This cotton knit Bat Cowl was made by Peg's niece Laura at Flour & Fibers
We sent her pictures of one of our cowls and she developed the pattern and knit up this very unusual baby gift.


This is one of the photos she sent for approvals.
Awesome right?  

Chuck and I were so thrilled and our client was thrilled as well.
Plus Little Luke will be able to wear/ have his picture taken in this cowl for a few years yet.

I guess the moral of this saga is...good things come with patience, endurance and lots of love.  
I would personally like to think all of our clients who have contributed to this saga of love and costumes because without them...Chuck would not have his Replica Bat Suit. Luke would not have a hat for his little head, and I...well....I would have a lot less fun at my job.

Adam West in costume                Chuck Williams in costume

Friday, November 11, 2011

Let's Dress up....in Costumes that is.

Now I am not a fan of Halloween as I like to avoid making light of death, demons, the devil and zombies.  But I do enjoy a good costume and dressing up is so much fun.  As attested to by these photos.

1966 Batman Mini me
 Todd Mello made this amazing mini replica costume for his son.  How cute is this?  
Tom did an amazing job and I am told that he used our Caped Crime Fighter Pattern  as reference,  
with the belt pattern being reduced down proportionally.


I was also informed that Todd had plans of a costume of his own, but ran out of time creating this super suit for his son.  
Having a husband who is a huge bat fan..I can appreciate the sacrifice that was made, but no doubt we can look forward to seeing the dynamic duo appear next year.

Really well done Todd, my cowl is off to you sir!

Paige Garrison as Marilyn Monroe
 Paige is a new student of mine and we have so enjoyed having her in our sewing group at Sewing Cafe.
Her mother taught her to use her machine, but she considers herself to be a beginner. 
She is fearless.  
This is not a project I would recommend to a beginner, but did she learn a lot...you bet!

 She had a party to attend with friends in Minnesota....friends who did not even recognize her I am told.

Paige Garrison as Marilyn Monroe
Well Done Paige!!

Looking forward to our next sewing adventure.

If you have any questions you would like me to ask our costume makers, please comment below and I will be sure to follow up.

My thanks to Todd Mello and Paige Garrison for sharing these photos with us.


Thursday, October 13, 2011

Caped Crime Fighter - Cape Sewing Tutorial


Okay Bat fans are you ready to sew? 

 Does your machine have a new  size 10 sharp needle in it?  
Has the bobbin area been cleaned out recently, within the last 24 hours?  
If not make sure to do this and check your tension on a sample piece of cape fabric before preceding.  Satin is very unforgiving and uneven tension will result in puckered seams.  Additionally fluff in your bobbin area will get drawn up by your thread, again resulting in uneven tension.


This tutorial is not meant to replace the directions that came with your WS1002 pattern, but to compliment them with additional tips.  

 To begin let's discuss why we have carefully marked our seam allowances.  In the image above you have a piece of cape satin.   The selvage/lengthwise grain edge is on the right, and the chalked line is on the true bias, or 45 degree angle from the selvage.  Seams that are sewn on the bias or even off grain will want to stretch as you sew the seam.


 Here I am stretching that seam.  I highly recommend you try this on a sample if you are unfamiliar with this attribute.  When you sew an off grain seam and do not stretch the seam moderately as you are sewing it, the fabric will stretch out around the seam creating the appearance of a short seam with folds of fabric cascading from it. 


The center back seam is on the straight of grain, but the side seams of the cape fall off the grain.  Pin the seam as shown above being careful to pin through your marked stitching line.  Place the pins so that you can remove easily as you approach them to sew.  Sew your seam with a short 2. stitch length and apply a moderate amount of stretch as you sew by holding the fabric in front of and behind the foot and creating tension, while still allowing the fabric to feed normally.  You will notice that your seam allowance narrows as you apply tension, this is why we marked our stitch line to prevent you from making your seam allowances to deep thus making the cape smaller.


Once you have your cape and cape lining sewn together along the front edge, you need to anchor the lining seams to the cape seams.  This inhibits the cape from bagging out between the layers. 
 On Adams original cape you will occasionally notice some hard pressed wrinkles around the hem. 
 Capes are not generally sewn together at the hem due to this problem which was minimized on his cape by this anchoring technique.
The picture above shows the two seam allowances, one from the cape, and one from the lining  being tacked together as the directions indicates.  
Be sure to follow the directions (step 5)as to placement of these tacks.


Step 8 instructs you to pin your prepared neck binding to your neckline and press it so that it curves to fit.  Make sure your binding lays nice and flat. 
 It will do this because you have cut it on the bias which allows it to follow a curve.  
This same neck binding cut on the straight of grain would not be able to do this.


Once your neckline is under stitched and pinned to the wrong side you Prick Stitch the binding to the cape along the folded edge.  A prick stitch is accomplished by sewing from the outside of the cape.  It is done just like a back stitch, but with the back stitch being very small on the top edge.  In the picture above you can see a sample being sewn using white thread.  To see a video of the prick stitch being sewn click here

Your finished neckline will look something like this. Notice the tiny stitches on the outside and the longer stitches along the binding edge.
This stitch takes some practice to get even, but that is what you trying to achieve, consistently even stitches.

The next few steps should be self explanatory, so let's move onto the infamous hem.


Your hems should now all be fused with the bias tape and the seam allowances cut back to match the shape of the hemline as seen on the lower side of the picture above.  Now that your seam allowances are all cut back carefully pin the hems together matching the cut edges.  With a short 2. stitch length straight stitch the hems together 1/8" from the edge.


To set up the sewing machine for this final step you will thread 2 black spools through your needle.  Most machines have 2 thread spindles for this purpose.  Adjust your stitch width until your finished zig-zag stitch is 3/16" wide.  Shorten your stitch length so that it makes a nice tight stitch a little longer then a standard buttonhole stitch.
 Again always make a sample first to check your results.
Position your foot as seen above when you sew your zig zag so that the right edge of the stitch just falls off the edge of the fabric, wrapping the stitch around the matched cut edges.
After all of this you will have some fraying which extends beyond the sewn edge, this can be trimmed back closely and will, for the most part eventually wear away.
The original cape was hemmed in the exact same manner.

Now pat yourself on the back for a job well done, or drink a nice glass of wine, if you haven't started already and get ready to make a cowl:)

Please feel free to leave any additional questions you may have, by commenting on the post.  If you subscribe to the post,  you will then receive the follow up questions and answers:)  Additionally it lets me know if the the information has been helpful to you:)

Wednesday, September 28, 2011

Replica Robin Mask

Boy Wonder mask offered by Lynne Williams - Williams Studio 2

I just listed 2 of these Replica Robin masks on my Etsy store. 
 These masks are made using the same pattern and fabric that Burt Ward approved and that used to sell on his official fan website.  They are made from a polyester fabric, lined with a satin, and interfaced.  They are adjustable to fit, just like the original, with elastic and a hook & eye closure.  


Henchman mask offered by Lynne Williams - Williams Studio 2

Of course you can wear them with your Robin costume, but they also work nicely as a henchmen accessory.

Saturday, September 24, 2011

Caped Crime Fighter Cape - Cutting and Marking


Your replica Batman cape should now be altered and ready for cutting.

Before we begin...
We need to discuss that satin can be directional meaning  the color will appear darker in one direction over the opposing direction....say what?


To demonstrate....mark one cut end of you satin "top"


Notice that when I flip one around how it catches more light then the other.  This property of satin if not addressed can make your garment look like it has been sewn with two different colors.  It is sometimes difficult to see in small pieces,  tragic when seen in larger sections.  I always advise avoiding the possibility altogether by careful cutting.

To begin  cut or tear your satin into 4 lengths of 60" each. Label the top of each length as you proceed to insure that your satin is running in the same direction for all of your pattern pieces.
To help conserve fabric you will be placing the pattern pieces in opposing directions as the lay out shows.  You will use one direction for your "face" or outer layer, and the other direction for your lining layer.
Being careful that you end up with 2 front , 2 front linings, 2 back and 2 back linings.


 Lay out both your cape front and back as the pattern instructs, but you will only be able to get one set out, the 2nd set will be cut from your other 2 lengths.


 With dressmakers carbon mark your seam allowances  and scallops on the wrong side of all 4 pieces.

  Additionally you will need to mark your snap location with tailor tacks.
 I like to use light blue thread for the male snaps and pink thread for the female snaps.


 You can now cut your pieces along the cutting lines except for the scallop hem.
For this I leave a generous edge around until I have fused the bias tape along the scallop.
Be sure to label your cut pieces by placing a low tack masking tape on the wrong side of the fabric, to insure you do not confuse your lining pieces with your face/outer pieces.

Repeat this with the other 2 lengths, laying the pattern pieces in the opposite direction of the first set.
Mark your seam allowances again with dressmakers carbon, tailor tack your snap placement and label each piece. 
The fusible bias tape used to control the seams.
Next to insure that our front edge stays crisp and hangs correctly and that the scallops in the hem retain their proper shape we will fuse a wonderful product called Design Plus bias fusible along our stitch lines in critical sections.


 You will iron this tape centering it over your stitch line down the center front on the face/outer side only.

You will than iron the tape along the inside edge of your marked hem.
 If you are using a taffeta like satin you may only need to do this on your face/outer side.  If you are using a silk satin or light weight poly satin you will want to fuse both your face/outer and lining hems.
 I highly recommend you do a test scallop on your fabric to determine what will be required.

Leaving the excess fabric makes the hem more stable and less likely to change shape as you press.
Additionally you can  keep the pattern pinned to the fabric just above the marked line. The tissue will help it retain its shape.
 Once you have it fused  your bias tape on you can trim off the excess fabric right along the edge of the bias tape.  Because this tape is cut on the bias it forms around the curves beautifully as you press it and will now stabilize the scallop shape for the finished hem technique.

In the next installment we will sew the cape and master that tricky hem.

Please let me know if you have any additional questions.
Should I start a Flickr group so you can post pictures of your progress or completed items?

Saturday, September 17, 2011

Caped Crime Fighter - Cape Alterations

 Look familiar Bat Fans?


 Here we have a replica Batman cape from the Iconic 66' Batman t.v. show starring Adam West.  This cape is made from a Poly Satin, is self lined and made from Williams Studio 2 Caped Crime Fighter Pattern...from yours truly:)

As you can see the cape is not particularly full and the pattern fits a  40- 42" chest.  If you are larger then this you will want to alter the pattern to fit your larger chest size.

Today I will show you how to accomplish this.


This shows the back of the cape in the Poly Satin.

The cape length is 51-3/4" from the back neckline to the end of the center point, which should just graze the top of your boot in the back. Adam was 6'2 and slim of build.  If you are more barrel chested but the same height you might require more length.
 See Why at Fashion Incubator

The width around the cape below the shoulder is 52"

Measure around your chest and arms to get a width measurement .


To alter your pattern you will need:

  • WS1002 Caped Crime Fighter Pattern
  • Tape measure
  • Tape - My preferred tape is soft cloth tape as found in the pharmacy/bandage section.  It does not tear the tissue, remains flexible, and can be removed if needed.  
  • Pens - Blue and Red
  • Rulers - A fashion ruler if you have one is helpful
  • Paper/tissue - golden threads, newsprint, tissue,
  • Your personal measurements - width and center back length


To begin remove your cape front and back pattern pieces from the tissue.  You do not want to cut out on the line, but just around the pattern pieces.  Press them to remove any folds and wrinkles with a dry iron. 

Now I am afraid we need to do some math...
 Fortunately for us I have a client I am currently making a cape for and so we will use his measurements as an example, but you will of course need to adjust accordingly.
  My clients chest/arm measurement is 62" which means we need to add 10" in width and we need to make it 1/2" longer.

To  maintain the correct look of the cape you need to add evenly around slashing and spreading through the center of each hem scallop.  
Mark a line(indicated by the blue vertical lines above) that begins at the mid point of each scallop and extends up through the shoulder line. 
 One of these lines will run along the dotted stitch line at the side seam.  
Mark another line(shown in red) perpendicular to the grain line(short black line) on the pattern.
Repeat this for both front and back pattern pieces.

Let's now determine how to divide the amount we need to add to our circumference.
Our pattern is only half of the garment, so begin by dividing the total amount required in half. Since I am adding 10", half of that is 5" 
Half of the pattern has 5 hem scallops and so I divide my 5" by 5. 
 This means I need to add or spread each vertical line by 1"
The scallop along the side seam falls into the center, so we will add 1/2 the total between the 2 side seams.  For me this means 1/2" along each side seam, adding 1" total.  

Still with me.....Cut narrow strips of your extra paper. I had some Golden Threads in the studio so I cut narrow strips that were slightly longer then the length of the pattern.


Cut your pattern along one of your  blue vertical lines, tape a narrow strip of extra paper along one edge.  
Extend your Red line across the strip and place a cross mark the amount you need to spread.  That is 1" for me.  Tape your pattern back together maintaining the correct spread width along the length and being very careful that your red line remains straight as well.  Once you have taped the front, turn the pattern over and place tape along the back of the pattern as well.  Repeat this step for the 4 blue lines that run through the body of the pattern.


Your shoulder line will be all a jumble now, so you need to redraw it, or blend it.


This is where a fashion ruler can come in handy, it has a nice gentle curve on it for pattern drafting.

Next we need to lengthen or shorten our cape.  If you are lengthening you will cut along your red line and spread it as you did the others the desired amount.  For my cape that was 1/2".
To shorten draw another line above your red line the amount you need to shorten the cape.  Now fold the red line up to the new line and tape securely.


Once the length is adjusted we can finish spreading our pattern by cutting along the side seam stitch line, starting at the bottom and cutting up to the shoulder curve point.  Do not cut through the pattern here, but leave a hinge so that you can spread the seam open the desired amount.  That is 1/2" for me, or half of the total amount you did on the other spreads.


This is about what your finished pattern piece will look like when you are done. 

Congratulations on altering your cape pattern.  If you have any questions please feel free to ask and I will do my best to answer them for you promptly.

Now that you pattern is ready I highly recommend you cut it out and sew it up in muslin or waste cotton so that you can make sure the width and length are correct for you.  You do not need to sew up the lining, a single layer should give you a good idea of  the over all fit.  Remember the front of the cape does not overlap at the chest. 
Related Posts Plugin for WordPress, Blogger...