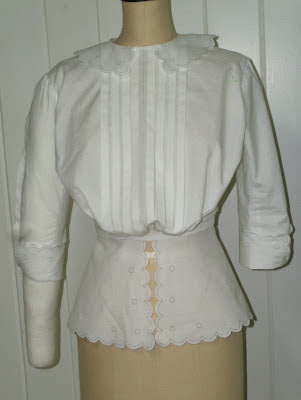
I have made some small progress on my first 1912 project blouse..
This is the illustration that accompanied my pdf pattern. There were no instructions but the templates for the embroidery work on the peplum cuffs and collar are included.
The pattern is labeled for a 36" bust
The measurments on the blouse are:
Bust: 37-1/2"
Waist: 23"
Hip/peplum width at hem: 43"
Sleeve length: 15-5/8"
Bicep: 14-5/8"
My size 6 dress form measures: Bust 35-1/2", Waist 24", Hip 34".
While taping my pattern together I noticed a few grain lines that did not match up....which makes me question my taping, but if you follow the stitch lines you can't be to crazy off, right?....
Once the pattern was taped I began trueing it up. The first thing you notice is that the back side seam measures 1" longer than the front.
The collar pattern has one of those mismatched grain lines and is not the same size as the template. The center back seam is not indicated on the back pattern piece so at this point I am unsure which pattern is correct.
There is no pattern piece for the waistband...hmmm
Additionally the tucks indicated on the pattern are in three different sizes:
5/8" on the fold, on the center front pattern piece
3/8" on the fold, on the back pattern piece
&
1-1/2" on the fold, on the sleeve
This is confusing to me and I am not sure if its a digitizing over sight or what.....
I chose to make them all the same size (5/8") because they look to be all the same in the illustration. But the reality of the situation is it doesn't really matter what size you make because you need to stitch them up on your fabric prior to cutting the pattern pieces out.
If you are unfamiliar with this process, no worries I will show you more about this when I make up the actual blouse.
For the muslin the tucks are not required, so you could skip this step for your muslin process if you like.
Here is my muslin without its sleeves or collar. Fortunately I have a size 6 dress form, very helpful for this process, as it takes some of the guesswork out of it.
The 3/4 view shows you how cleverly the fullness is kept to the front, while the rest of the garment hugs the body...and I mean hugs.
In this shot you can see how the side seam favors the back as it approaches the armseye.
You might be asking yourself at this point what happened to that 1" difference along the side seam..
I decided at this stage to baste the peplum on 1' higher across the back of the bodice.
Once it was all together it occurred to me the difference in the side seam length might explain the missing waistband piece...Could the waistband sew to the front only making up the 1' difference needed to match up to the back? Will try that next so stay tuned.
..
The shoulder seam favors the back as well, not at all unusual in garments from this period.
And finally we have the back, which will fit better once that peplum gets moved down an 1"
I am looking forward to sewing the sleeves, collar and adding that waistband so don't forget to check back to see how that effects things.
This is my kind of mystery I tell you what:)


