Sewing Cafe

Patterns, Tutorials and Works in Progress from the Sewing Studio of Lynne Williams
Showing posts with label Historical dress. Show all posts

Tuesday, May 22, 2012

1912 Project Blouse #1000 Muslin Complete

I took a half day off of work, which is to say cape sewing, to finish the muslin for blouse #1000.
The last time we looked at the muslin it still needed its sleeves, front waistband and collar.


Now it has all of its appropriate parts.....attached even - lol
You can just see a bit of the front waistband.  I cut 2 pieces 1-3/4" x 12-3/4" to create the waistband and waistband facing.  This creates a finished waist measurement of 24".
Take one of your waistband strips and press to the wrong side along one long edge and both short edges 3/8".  This will become your waistband facing.
Sew the waistband onto the shirt front gathering between dots. 
Repeat with the facing piece, sandwiching the blouse between the two and being careful to leave the facing free from the seam allowance edge on both short ends.
Press your seam allowance towards the waistband.
You can now sew your side seams.
Once you have attached the peplum you can finish the waistband by hand stitching the facing in place to cover the seam allowance.


I love how in this angle you can really see the appropriate silhouette for the time period. A little more bust and you would have less drooping at the front waist. Remember my dress form is 2" smaller at the bust than the pattern measures.
  Notice though how this right(seen on the left) sleeve drags a bit to the back of the blouse?


This sleeve hangs correctly because the peak of the shoulder is siting in the correct place and the gathering is distributed correctly.  
You can replicate this by:
 Placing a notch on the front bodice 3/4" forward of the shoulder seam, that will mark the actual shoulder.  Remember how the shoulder seam favors the back of the blouse?
Now place a corresponding notch on the sleeve cap in the center of the tuck lines.  Doing this will make setting in the sleeve much easier and prettier.

The cuff does not quite meet at the center to expose the tuck detail, but some gathering is required to make the sleeve fit the cuff.  
The total amount of gathering is 1-1/2"  I placed dots (to gather between) on my sleeve pattern 1-1/2" on either side of center for a total of 3".  Stitch a gathering line between these dots and adjust to fit your cuff.


The pattern allows for a 1/2" finished placket and you might want to add a little more to this depending on the size of your buttons. 
The peplum allows for a little more fullness over the seat than my dress form has, but should accommodate a "real" seat quite nicely, maybe even a bit of a bustle.


I finished the collar by using a narrow piece of self bias as a facing strip.  
From the looks of my collar though it appears as if I may have one side on back to front.....I thought I double checked that, but that extra bit of lift there on the left side lets me know something is not quite right.


Boy you can really see it in this shot.  
The collar fits in beautifully though if you leave a 1/2" space at the center front.

Now its time to adapt a muslin for contemporary wear....But before I can do that I  need to rig a roman shade, alter a bridesmaids dress and cut out another Bat Cape.

What will you be sewing today?

Tuesday, May 15, 2012

1912 Project - Blouse #1000 - Muslin

I have made some small progress on my first 1912 project blouse..


This is the illustration that accompanied my pdf pattern.  There were no instructions but the templates for the embroidery work on the peplum cuffs and collar are included.

The pattern is labeled for a 36" bust
The measurments on the blouse are:
Bust: 37-1/2"        
Waist: 23"            
   Hip/peplum width at hem: 43"
Sleeve length: 15-5/8"    
   Bicep: 14-5/8"

My size 6 dress form measures:  Bust 35-1/2", Waist 24", Hip  34".


While taping my pattern together I noticed a few grain lines that did not match up....which makes me question my taping, but if  you follow the stitch lines you can't be to crazy off, right?....

  
Once the pattern was taped I began trueing it up.  The first thing you notice is that the back side seam measures 1" longer than the front.


The collar pattern has one of those mismatched grain lines and is not the same size as the template.  The center back seam is not indicated on the back pattern piece so at this point I am unsure which pattern is correct. 
There is no pattern piece for the waistband...hmmm

Additionally the tucks indicated on the pattern are in three different sizes:

5/8" on the fold, on the center front pattern piece
3/8" on the fold, on the back pattern piece
&
1-1/2" on the fold, on the sleeve

This is confusing to me and I am not sure if its a digitizing over sight or what.....
I chose to make them all the same size (5/8") because they look to be all the same in the illustration.  But the reality of the situation is it doesn't really matter what size you make because you need to stitch them up on your fabric prior to cutting the pattern pieces out.  
If you are unfamiliar with this process, no worries I will show you more about this when I make up the actual blouse.
For the muslin the tucks are not required, so you could skip this step for your muslin process if you like.


Here is my muslin without its sleeves or collar.  Fortunately I have a size 6 dress form, very helpful for this process, as it takes some of the guesswork out of it. 


The 3/4 view shows you how cleverly the fullness is kept to the front, while the rest of the garment hugs the body...and I mean hugs.


In this shot you can see how the side seam favors the back as it approaches the armseye.
You might be asking yourself at this point what happened to that 1" difference along the side seam..

  
I decided at this stage to baste the peplum on 1' higher across the back of the bodice. 
Once it was all together it occurred to me the difference in the side seam length might explain the missing waistband piece...Could the waistband sew to the front only making up the 1' difference needed to match up to the back?  Will try that next so stay tuned.

..
The shoulder seam favors the back as well, not at all unusual in garments from this period. 


And finally we have the back, which will fit better once that peplum gets moved down an 1"

I am looking forward to sewing the sleeves, collar and adding that waistband so don't forget to check back to see how that effects things.

This is my kind of mystery I tell you what:)


Friday, May 4, 2012

Vintage Fashion - A Spectator by Guildford

I feel I must begin this post by apologizing a tad for my lack of enthusiasm for blogging...following blogs...posting....commenting ....etc.  
I have been working on some fun projects though and when my enthusiasm returned I could not find my camera!!  Seriously.....it's not like me to panic about these things....no matter how organized I am, I misplace things on a fairly regular basis.... usually they reappear eventually.  
My camera made it's appearance last night when my mother handed it back to me -lol

So first thing this morning I captured these pics of  a vintage dress of my mothers.


She purchased this dress in the early 50's when she was a girl of 15 to wear to a school dance.
She used multiple crinolines under it and wore it with a black patent leather belt and black pumps.
The belts chains on the dress are in black and would accommodate a 1 inch belt. I used a piece of velvet ribbon I had about.

The skirt is made in 8 gores and the hem circumference  measures 260 inches!
In these pictures I have 2 crinolines under the skirt and it could easily be double that.
Makes you want to dance doesn't it?


The cotton on this dress had a glazed finish on it, which has worn away due to multiple washing's.
My bad....I wore this dress frequently in the 80's and machine washed it roughly as young people will.
It zips up the side with a metal zipper and has one pocket in the skirt opposite the zip.


Love the details on this dress - These little appliqued roses are all tacked into place with a single rhinestone.
Additional rhinestones are scattered over the bodice.


The neckline and armholes are piped and faced.
I just love the elegant square neckline on the back


The hem is done with rayon seam tape and all of the seams are pinked...so simple


The inside label reads " A Spectator by Guildford" and is the only tag in the garment.
Does anyone have any information on this company?
There is a town by the name of Guildford in the UK...but I did not round up any info for this company.
So for those of you who like a good mystery....

I promise to catch you up on the 1912 project, my gardening overalls, my bra making adventures, the craftsy block of the month project, and Chucks latest endeavor an original scultpture of Adam West

Tuesday, April 17, 2012

The 1912 Project - Oh my!!

The 1912 project has taken a radical turn which has me in a conundrum....sigh

When the good folks at the Vintage Lending Library began their project of digitizing and printing patterns from La Mode Illustre, I seriously doubt they expected to have 400 people want to participate.  This left them with the herculean task of not only digitizing the patterns, translating what directions there were from French into English but also distributing those patterns to all of the eager test sewers. 

 Imagine trying to organize 400 eager stitchers! 
 I truly applaud their efforts.

The logistics of this trial has produced important organizational changes the gist of which leaves me deciding which patterns I would like to sew up for them......Honestly I was quite happy with this decision being out of my hands...one less decision for me to make and I like the era, so it's all good....right?

So I am asking for your help dear readers.  After looking through all of the available designs (currently available that is) I chose the ones below as my favorites or possibly useful garments. 
 I can ask for as many as six!  But which do I choose?
What do you think?  Help me choose a design to sew up and blog about.  What catches your fancy?


LADIES DRESS IN JAPAN BLUE TAFFETA WITH SATIN TRIM
#1
This dress has an appealing hem detail and looks relatively straight forward construction wise.  
Could it be useful if the length was modified or do I make it for display/sale?  

LADIES SKIRT WITH SIDE GORES
 #2
This skirt could be charming in a mid calf length( so possibly useful) and it too appears straight forward in construction.
SUIT FOR YOUNG WOMAN IN MARINE BLUE WITH WHITE STRIPE
#3
 This suit is quite intriguing....The suggested fabric is a pin stripe and the pockets are pieced so that the stripe miters.  The collar detail is lovely and it too has an interesting hem detail this time at the back of the skirt.  This would be for display or for sale.


LADIES JACKET IN HEAVY WOOL WITH VELVET ACCENT
 #4
I am in need of a coat and this could be done as suggested in a wool with velvet accents.


LADIES BLOUSE WITH OUT LINING IN CHECK FABRIC WITH STIFF LINEN COLLAR
 #5
This is the perfect school mistress blouse right?  I could update it for sure and I do need blouses:)
Another plus...it's not a large time or financial commitment

LADIES DUSTER COAT
 #6
Another coat possibility...Trim, buttons and large patch pockets in a modified 3/4 length...Rather nice, but what fabric? What color?
Love the hat...not included of course - lol

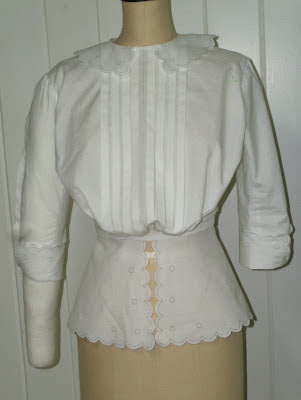
LADIES BLOUSE WITH CUT WORK AND PLEATS
#7
Another useful blouse....oh so sweet, and yes I would consider hand finishing those scallops and embroidering those charming dots or are they eyelot holes?  Not a fan of the peter pan collar on me but again I could modify that to a more suitable shape but retain the scallop detail

Please vote and save me some agonizing. 
I am looking forward to hearing your opinions.

Tuesday, February 21, 2012

The 1912 Project


Ahh the Titanic.  
As many of you already realize this year, in April is the 100th anniversary of her fatal voyage.  It has launched many events for this year at Museums and tea rooms around the world. 
 An opportunity for re-enactors to gather in Edwardian Costume and Historians to reflect on the folly of man's pride and ambition.

Janyce over at the Vintage Pattern Lending Library has almost as large a task in front of her as the launching of the Titanic.  
She wants to release all of the patterns from La Mode Illustree - once France's foremost publication of fashion of that era.  
This requires the digitizing of all of the patterns along with scanning the illustrations and writing directions.  She has enlisted the help of seamstresses to test sew each and every garment for her.  So far 400 people
( me included) have gleefully responded, so many in fact that we have been divided up into groups, 33 at last count.! As she completes the patterns she randomly selects a group to send them to.  Upon receiving your pattern assignment your fun begins.  

 This duster pattern was recently released to the participants in one group. 


This skirt is the most recent release.


This wrap should prove simple enough to create, but what an opportunity for some fine embellishment.

Some of the participants have plans to only sew muslin's, some have plans on making costumes to fit themselves or others, and a few have plans on making doll clothes.


Click on this picture to see more
 The participants have all different levels of sewing experience, which provides an excellent testing ground for the Library.  The resulting sewing directions from such a base should provide a superior product when they are offered to the general public.  
 In addition to the web-site a face book group has been launched and the sharing of knowledge and resources is impressive.

So we all have something to look forward to then.  A year of Edwardian fashion to fulfill our Downton Abby dreams.

If your participating please comment with a blog link so we can follow your progress as well:)

Friday, January 13, 2012

Victorian Bodice Thrift Store Find

Late this summer I stopped by a local thrift store, one which I have not been into for years, to shop for vintage sewing items.  Upon walking into the dust and gloom( very grandma's attic like) I spotted this brown silk taffeta Victorian bodice!!
Warning! This post is very photo laden, so it may take time to load, but if you are a fan of Historical dress I hope you will find it well worth the wait :)


 Simple and so lovely.
It measures 34" at the bust and 25" at the waist, 12" across the back


All of the latest fashion with it's origami folds has nothing on these Victorian forerunners.
After doing some research I would place this Cuiraisse style bodice from about 1880.  
The fan detail here on the back suggests that the skirt that originally went with this bodice had a slim front with back bustle. 
 Similar to the picture below of Lumina Garnier

Photo courtesy of  Garnier Family Photo collection
Are you ready for the detail shots?


The bodice has 18 shell and metal button.  Very difficult to photograph I might add.  
The cut silver disc sits on top of what appears to be black mother of pearl which has a fluted edge.
3 of the buttons are missing :(


Sleeve cuff detail  on the 3/4 length sleeve.


The pleating/folds which would lay over the bustle.


The hand worked buttonholes which are more then half covered by the front tucks.


The interior is flat lined with brown twill and has one bone along the center back seam which extends past the waist. The inside placket piece closes with hooks and eyes at the waist.
you can see the selvage edge of the fabric along both center fronts. 


The seams appear to be machine sewn and hand overcast.
This shows a the intricacies of the back pleats/folds


I picked out a few stitches at the top of the bone casing to reveal the type of boning used. 
I believe its reed but have not confirmed this.

A final shot of the interior with the price tag still attached.  
The inside of the collar shows some loose threads which suggest that lace was sewn in at one time or perhaps a velvet ribbon?  Nothing similar at the sleeve cuff which could have been a possibility there.

This bodice still needs to be cleaned which I am still doing research on but I am thinking of making a skirt to go with it, so that it can be properly displayed.

For all my blogging friends who have a passion for historical clothing I would welcome any suggestions and information you would be willing to provide on its proper restoration.

If there are any other pictures or info you would be interested in, in regards to this bodice please feel free to ask.
 I will be happy to oblige:)

Related Posts Plugin for WordPress, Blogger...