
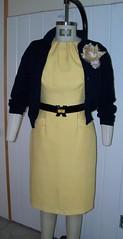
Yellow Silk Dress with sweater Here is my Mad Men Sew Along Dress with a belt mocked up....awaiting the arrival of the correct Navy velvet ribbon
I ordered two pieces of velvet ribbon from MJ Trims while my dress was under construction. A yard of Navy and a yard of black. I wanted to make sure the Navy was truly dark enough...it can be difficult to tell these things when ordering on-line. The navy turned out to be ideal though. So Lets get started with making a belt from a lovely piece of ribbon.

My vintage buckle appears to be plastic, possibly Bakelite, but I have not tested it or had it appraised.
It is 2-1/4" tall by 2 -3/8" wide Although the dark part appears to be black in this photo, in reality it is a dark navy.
 I cannot recall where I found this beautiful buckle, but apparently I only paid $5.00 for it. How Fantastic! It may have been years ago but how satisfying to have on hand to finish off my dress. The back shows you the attachment bars for the belting and my ribbon sitting above it measures 1-7/16" I need my finished belt to measure 29" and my attachments are 1" apart. I cut my ribbon 31-1/2" so that I have some turn back, an adjustable turn back and seam allowance. Next I cut a piece of light weight buckram 1-3/8" x 29" and a piece of black cotton twill 2" x 31".
 The buckram will add stiffness to the belt to keep it from collapsing on me while wearing. They used to make belting for this when covered belts were more often seen, but buckram or heavy craft interfacing will work.
 To begin I spray baste my buckram onto the center of my lining, leaving 1/4" on each long side and 1/2" lining on left side with remaining 1-1/2" on the right side. I fuse 1/4" steam a seam 2 onto the seam allowance of the lining along both long sides.
  Then remove paper backing from one side turn down onto buckram and press. Repeat for the other long side.
 With right sides together sew the short ends of the velvet ribbon to the short ends of the lining using a 1/4" seam allowance. Turn right side out. The seam allowance will naturally want to lay towards the ribbon. Now I want to make this belt adjustable and so I am adding some 1-1/2" strips of Velcro to the inside of the belt just to the right of the buckle. My Belt although in a large loop is in 2 sections, the lined buckram and the ribbon By sewing my Velcro on now the stitching will not show from the right side. I sew the male Velcro on first through the buckram and lining only and repeat for the female Velcro 1-1/4" away from the male.
 Once the Velcro is on, I edge stitch the ribbon to the Velcro along the long edges securing the two together. I then thread my short ends through the buckle attachment bars. The right side simply Velcro's close while the left side will be stitched by hand to secure. Notice how the female side of the Velcro is facing...so that the soft side will be rubbing against your clothing.
Have you ever made a belt?
What materials did you use?
Did you know that belts are very much back in style? ( this is a hint)
Please share your belt making adventure with us.
What a lovely dress. I haven't tried a belt but having been wanting to. I will refer to your instructions once I settle on color, fabric, etc.
ReplyDelete