Sewing Cafe

Patterns, Tutorials and Works in Progress from the Sewing Studio of Lynne Williams

Sunday, September 4, 2011

Fall Wardrobe - Moss Wool skirt

Remember this dress from the Mad Men challange?


And remember this moss wool, and skirt inspiration that I want to make for fall?

Now that I have spent the necessesary time and effort to fit the dress, I can create my skirt using the skirt from the dress pattern. 

 The changes I will need to make are: 
Style changes :
  1.  Narrow the skirt towards the hemline, so it creates a little more of a pencil skirt, but not to much because this can quickly add up to me looking hippy and drawing attention to the fact that my legs are less then elegantly long.
  2. Create the hem detail
Pattern changes:
  1. Create a waistband
  2. Adjust the ease at the waist appropriate for a skirt.  Did you know that dresses require 1.5" of ease at the waist where a skirt only requires 3/4"?  So I need to lose 3/4" of ease.
I began with the pattern changes.  Trimming a fat 1/8" off of each side seam takes care of the additional ease.  Then tapering that down to 1/2" at the hem, which I am hoping will provide a hint of my pencil look, but the muslin will let me know if I am correct about that or not.

The hem detail is next and for that I cut off 3" from the bottom of the skirt, carefully labeling so I don't get the front and back confused. 
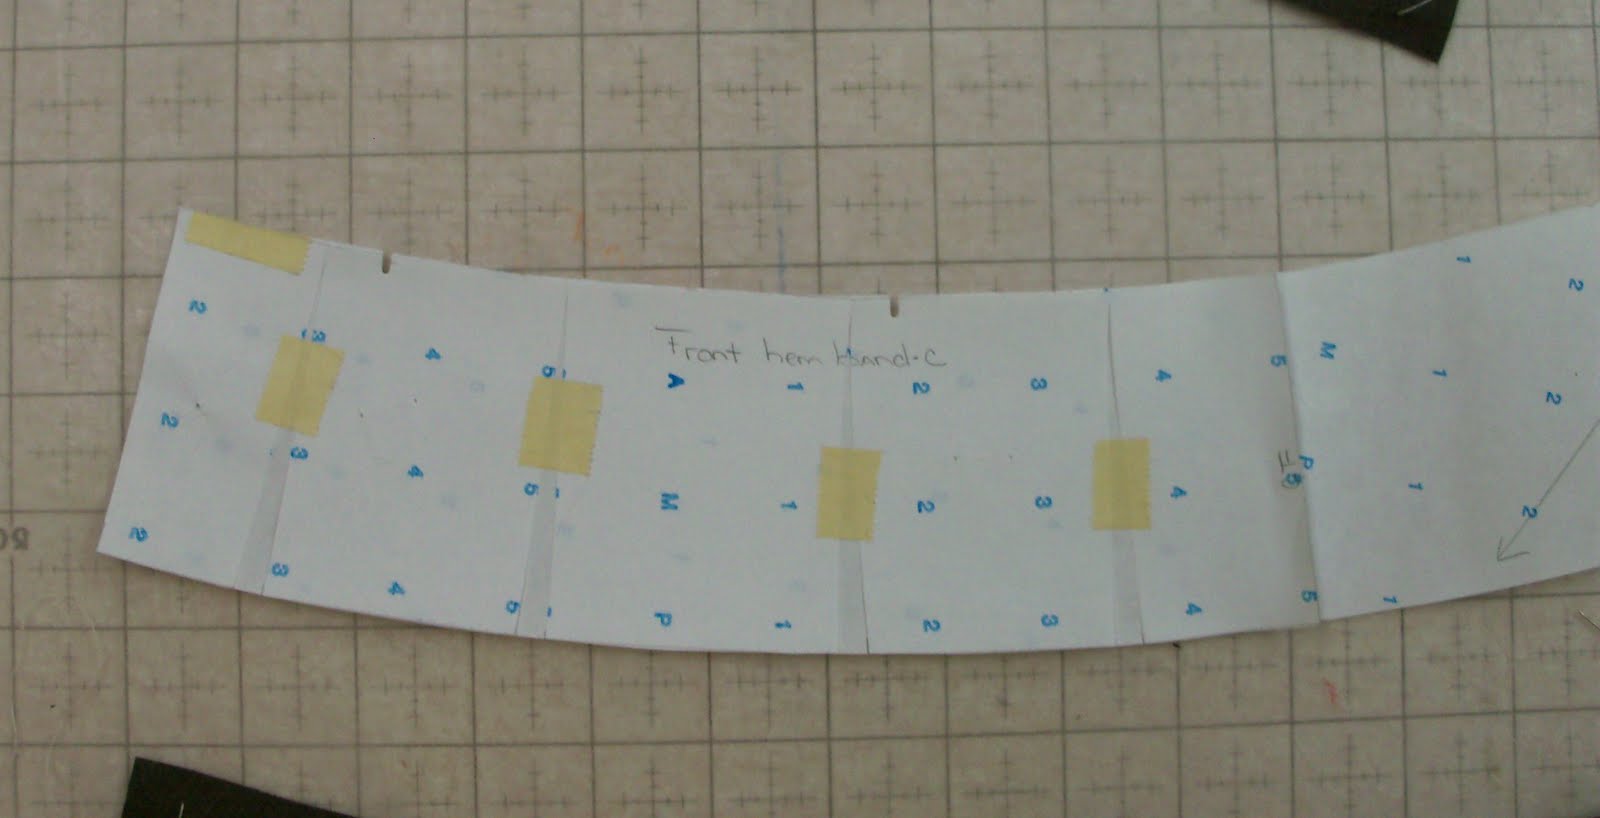
slashing and spreading to add fullness to 1/4 section of skirt hem band

It looks to me like the hem detail has a touch of the flounce to it, and so I make four cuts into each pattern piece, leaving a hinge where it joins the skirt and spreading the hemline.  I spread each one 1/4" is all because I don't want a ruffle, just a bit of a flip.

Time for the muslin, which stitches up quickly.  I grab my shoes and my husband, who is great help with judging proportions for me, slip into the skirt.....and decide....I was correct about the "pencil" amount, as well as the spread on the hem band..."and there was much rejoicing". 


The length however need to come up a bit,  to just below the knee which meant shortening the skirt by 1.5".

Now that, that is decided I can make my additional hem band pieces, as it has 3 layers of unequal width and length.  I trace my hem band twice, layer them and cut them to pleasing shapes. 
 Nothing to it:)

Time to cut some wool.  Surprisingly when I went to cut my fabric I discovered I did not have an appropriate length of lining that would suit.  Although a little frustrated by the delay I will console myself with the thought that it simply means I must be effectively reducing my stash....don't you think? 
 In the meantime I will go paint my daughters bedroom, which will now be called the "Guest room"


Won't this skirt look great with this wonderful jacket I made a few years back(goodness back when my hair was long even) from a Vintage Vogue pattern and an Angora wool blend houndstooth I picked up at Ginnys Fine Fabrics

Fall Essentials and Palette challenge Post 1
Additional fabric contenders for Fall Essentials and Palette challenge Post 2

Saturday, September 3, 2011

Wonder Boy Trunk Tutorial

Voila' Trunks fit for your helpful side kick. 

Now lets learn the finer points of sewing them up.

Due to Chucks mighty hunting powers, we are fortunate enough to have some original cotton spring weave fabric which has been dyed to match the Pantone color in the
The original fabric was loomed on a 10" tube which eliminates all vertical seaming.  Pretty neat:)
The trunk pattern has been drafted though for current standard widths, and you will want to follow the pattern directions for the layout. The pattern sits on the tubular yardage along one fold line and along the center back stitch line, thereby eliminating the unnecessary seam allowance.

The spring weave is quite thick when not stretched to its full potential and so I used pins  to hold the tissue in place and then cut with scissors.
 My rotary cutter just couldn't accommodate the bulk.
Mark your eyelet hole placement using Tailors tacks, or a light colored chalk pencil.


Once you have marked it remove the tissue carefully so the thread remains on your fabric.  Separate the fabric layers and cut the thread in between leaving thread marks on both layers.

My Bernina provides a nice little stitched eyelet hole.  Its #13 under the buttonhole stitches and uses the #1 foot. 
 Always stitch a sample on your fabric to check for tension issues. 
If you do have tension issues consult the manual for your machine.


I have stitched my sample in a contrast color just so you can see what the stitch looks like.  When I use matching thread it practically disappears.
Mine looks great, one of the things I like about my Bernina, rarely need to make tension adjustments:)


Leave thread tails when beginning and ending your stitch.
Pull tails to back and tie in a knot with the tails from that side.


Using a hole punch create a hole in the center of the stitching.

The original costume used a zig zag stitch to finish the seams.  So let's talk a bit about how to properly use your zig zag stitch for this purpose.


You don't want your zig zag to curl the cut edge of your seam, so proper width and stitch placement is important to keep that from happening. 
I can use the default the settings on my zig zag stitch which = 1.5m length and 3m width.

Release the tension between your foot and feed dogs to prevent undue stretching.  Zig zag with the cut edge running along the inside edge of your foot, so that when the needle jumps over to the far right position it stitches just off of your fabric.  This keeps the cut edge from curling under and creating a bulky rolled edge.

A note about the crotch seam.


You will notice when you place your front crotch seam to the back crotch seam that the back is longer.


 Pin the seam along both ends and then stretch until even and pin in the center.  This extra length in the back allows for a more comfortable seat coverage across the tush


Your stitched, zig zagged and edge stitch crotch seam.

Press your waistband and leg opening to the wrong side along the fold line indicated on the pattern.
Straight stitch leg casing 3/8" from fold, stretching a tad as you sew to insure the stitching will accommodate your upper leg circumference.
Straight stitch waist casing 7/8" from fold.


Run 1/4" elastic through the leg casing.  Over lap short ends and stitch across to secure.  Finish sewing casing.

These tiny trunks will actually stretch to fit a small male!

Run your shoelace through the waist casing and you are done.  You now own a pair of authentic and accurate side kick trunks. 

Now, to the Bat Cave...


Friday, September 2, 2011

Fall Wardrobe Sew Alongs - best get sewing

Acorns aglow(Zsaj's photostream on flickr via Pinterest) my fall color inspiration
Now that I am fully committed to sewing for fall, who should provide more inspiration for me then Collete Patterns and Rhinestones and Telephones.  Both of them are running fall sew alongs and you will find badge links to the right for both them.

The Fall Essential Sew Along has a Flickr group to join and Collette Patterns has a forum where the gals are posting palettes and inspiration like mad....and I mean like mad:)  I am so impressed by the variety of lovely color choices and exciting inspiration and it will no doubt be fun to see some of it come to fruition.  I do say some, because as we all know just because you dream of making a lush fall wardrobe it does not mean all of it has to get made this year or ever.
(this is an important reminder for myself to not get overwhelmed)

What really overwhelms me is how computer savy sewing bloggers are.  A testament to a generation that has grown up with this handy tool, but it leaves me feeling a bit......old....there I said it...that's right old and possibly grasping for my youth by hanging out with all of these up and coming stitcher's, who know all about smart phones and tablets and apps....oh my.


Here is my first ever color palette created on Colourlovers  where you can browse palettes created by others or make your own.  I used the Acorns Aglow photo as my inspiration. If you have some time to play its a great little sandbox to expand your horizons in.

silk chiffon   silk charmeuse   kimono silk       more silk charmeuse    kimono silk

My wardrobe choices will be expanding on my previous fall wardrobe post but I will hopefully be adding some of these fabrics from my stash into the mix.  Luscious right?  So excited to get pattern drafting and sewing, so enough with the blogging and off to the pattern table.
Please stay tuned for more of the plan.


Hope everyone enjoys their weekend.


Related Posts Plugin for WordPress, Blogger...