Sunday, November 13, 2011

Jasmine Blouse Review

The Jasmine blouse felt like a long journey, but I am pleased with the changes I made and look forward to hearing your thoughts on the project.
 It is my final Fall Palette Challenge piece, outside of a sweater I am still knitting.
 It's a good thing I am bringing my fall sewing to a close seeing as how we received our first snowfall this week....6" or more!  Most Alarming!

Jasmine blouse by Lynne Williams with revisions
 The fabric had a border pattern running across the grain about every 30" which required some planning. 
 I drew up a few sketches placing the border at various locations and ended up with this plan. 
 Placing it along the top of the pattern framed the neckline in front, and reminded me of a midi blouse.

Jasmine blouse by Lynne Williams with revisions
On the back you can see I placed the border just over the hem which I think accentuates the curves in my figure.

As mentioned in a prior post, the pattern is accurately made and the instructions are very easy to follow.  I can certainly recommend this pattern especially if you want to learn how to sew a bias cut garment.  
You will  learn  about working on the bias while keeping the project simple and not get yourself  overwhelmed.


I changed the length of the sleeve to fall below my elbow.  
A simple change - lengthen the sleeve pattern by the desired amount. 
Then I ran a gathering stitch around the hem edge and created a narrow 1/2" band to finish it.  
I used a strip from the border print to set it off.
My hem band was cut 2" x 9" and of course I cut 2.

I also brought the neckline in 1-1/2" towards my neck on each side.  I love the width of the original pattern, but it just was not flattering for my narrow little skull-lol, or maybe it is my lack of jaw....probably the combination.  If you can wear it wide by all means do so...its so lovely like that.


I also changed how the collar was made and assembled.  
The collar pattern has 2 parts a collar back and the collar front which lengthens into the tie. 
 You are instructed to cut 4 front collars and 2 back collars, like a standard collar.  Additionally it has a interfaced facing...front and back. 
 I am not a huge fan of facings, they tend to be difficult to control, additionally I did not think the collar laid particularly well, it wants to ripple along the outside edge.
Instead I chose to make the collar a sash cut on the bias and folded in half lengthwise. 
This causes the gentle roll, which lifts it upwards from the neckline and the outer edge lays nice with no rippling.


I then replaced the facing with a strip of self bias like you see on many knit necklines.

I plan on making another one of these blouses from one of my silks.  I just hope I have enough of this lovely periwinkle charmeuse I have had in my stash for about 20 years!!  It is one of those fabrics you love so much, you are afraid of doing the wrong thing with it. 

Do you have fabrics in your stash like that?.

My apologies for not having pictures of me wearing the blouse, its so much easier to slip it on my form and snap a picture and get blogging then setting up for a photo shoot.  I understand this is breaking a cardinal rule of good blogging...but it's so time consuming....plus it leaves me room for improvement-lol

Maybe one day I will have my act together enough to take wonderful fashion /location pictures like some of my favorite blogs....girls I think you know who you are.  I do so appreciate their efforts....one day.....one day.

Friday, November 11, 2011

Let's Dress up....in Costumes that is.

Now I am not a fan of Halloween as I like to avoid making light of death, demons, the devil and zombies.  But I do enjoy a good costume and dressing up is so much fun.  As attested to by these photos.

1966 Batman Mini me
 Todd Mello made this amazing mini replica costume for his son.  How cute is this?  
Tom did an amazing job and I am told that he used our Caped Crime Fighter Pattern  as reference,  
with the belt pattern being reduced down proportionally.


I was also informed that Todd had plans of a costume of his own, but ran out of time creating this super suit for his son.  
Having a husband who is a huge bat fan..I can appreciate the sacrifice that was made, but no doubt we can look forward to seeing the dynamic duo appear next year.

Really well done Todd, my cowl is off to you sir!

Paige Garrison as Marilyn Monroe
 Paige is a new student of mine and we have so enjoyed having her in our sewing group at Sewing Cafe.
Her mother taught her to use her machine, but she considers herself to be a beginner. 
She is fearless.  
This is not a project I would recommend to a beginner, but did she learn a lot...you bet!

 She had a party to attend with friends in Minnesota....friends who did not even recognize her I am told.

Paige Garrison as Marilyn Monroe
Well Done Paige!!

Looking forward to our next sewing adventure.

If you have any questions you would like me to ask our costume makers, please comment below and I will be sure to follow up.

My thanks to Todd Mello and Paige Garrison for sharing these photos with us.


Friday, November 4, 2011

In the Studio this week - Swing Coats and Bunny Uniforms

I have come to realize that sometimes I make promises on this blog that I do not keep.
  It's a shocking thing to realize about yourself.
  In an attempt to rectify this bad habit I am sharing what Peg and I have been working on in the studio this week(as promised...), which has been a dressy swing coat with matching hand muff, alterations, and a Playboy Bunny uniform.


This silk taffeta swing coat was made using a Butterick 4928


My client/student is making a dress from the same silk taffeta, and due to her date deadline :) decided it was advisable to split the project up by having me make the coat.

 This elegant dress coat has a surprise....


It's lined with Minky, yes Minky and we made a very warm Minky lined faux fur hand muff to compliment the coat.  If you are in need of a dress coat...and who of us is not?.....I can recommend this unusual combination of fabrics.  The coat is lightweight and oh so cozy, with its warm and comfy lining.  If you don't need a dress coat..how about a housecoat?  Think about it....Right?

Now on to the Bunny Uniform... because who wants to talk about alterations when there is serious costuming to discuss.
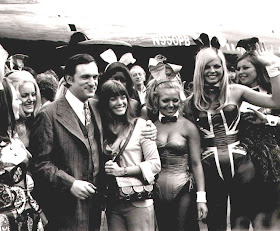
The girls in club uniform greeting Hugh Hefner at the airport
A favorite client of mine commissioned the Union Jack Bunny costume, (seen at far right), but the seamstress who was hired to add the flag pattern became ill, making it impossible for her to do her part. 
 I hope she is feeling better soon

Union Jack Playboy Bunny Uniform in progress.

Enter Lynne.....who received  a base suit made by Bunny PJ in Navy blue, with tail and name tag. Following many reference photos I have begun basting satin ribbon onto the suit to replicate the Union Jack Flag.

Union Jack Playboy Bunny Uniform in progress.
As you can see I have the central cross section basted on, and will start laying in the angled sections soon.  
The costume arrived with ribbon, which was a nice time saver, but unfortunately I believe that one of the red ribbons is in the wrong width....so I am on the hunt for some 5/8" red satin ribbon which will match the red I already have.


My dress form is a little small in the waist for this size 8 suit which accounts for the bubbling going on...but notice how the ribbons go over and under each other?  Interesting I thought. 
 Once all the basting is done the hand applique will begin.

So there you have it...this week in the studio. 
 No progress has been made on my Jasmine blouse as of yet...maybe this weekend.
  I am such an optimist...